Managing Users
From SkylineGlobe Server Manager's Users page, you can view and manage the users allowed to administer and access resources on SkylineGlobe Server. All users are assigned user roles which define their level of access: super administrators can manage all their server's sites, settings, users and layers, site administrators can manage all their site's layers and users and some server settings, publishers can view and edit published layers and add layers to categories, while viewers can only view published content. The following user management activities can be performed from the Users page:
§ Adding users and setting user properties
Searching for Users
To search for a user whose property information contains a specific string (e.g., User name, group, role, Active status), do the following:
1. From the SkylineGlobe Server Manager menu, select Users. The Users page is displayed.
2. In the Search String field, type a search string or enter an attribute, condition, and value and click Insert String ![]() . The search expression is displayed in the Search string field.
. The search expression is displayed in the Search string field.
3. If you want to include additional strings in your search expression, select a connector: ![]() and OR or, and repeat step a for the next condition.
and OR or, and repeat step a for the next condition.
4. Click Search. Your search results are displayed in the search results list at the bottom of the page.
Adding Users and Setting User Properties
To add a new user:
1. From the SkylineGlobe Server Manager menu, select Users. The Users page is displayed.
2. Click Add New User. The Add a New User dialog is displayed.
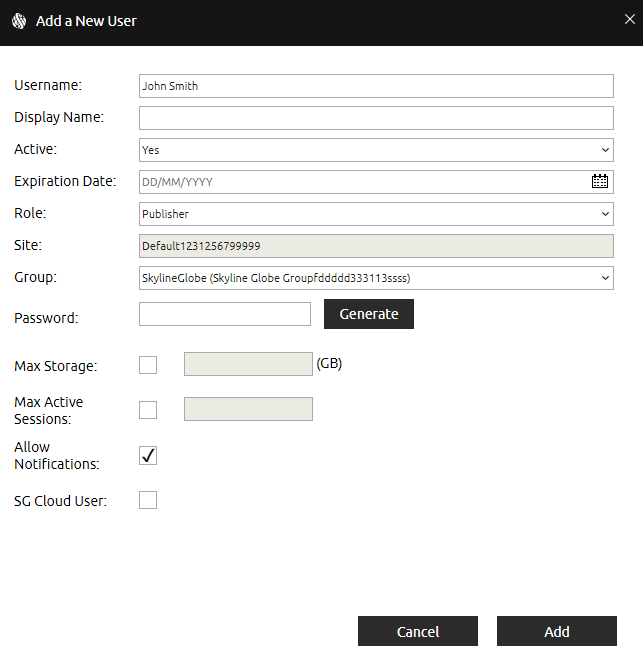
Add a New User Dialog
3. Enter the following information:
|
Field |
Description |
|
Username |
User name. |
|
Display Name |
The name to display in the SGS and TEF user login. This is only the name displayed. To actually log in, the Username must be entered. |
|
Active |
Select if the user account should be currently active. |
|
Expiration Date |
Expiration date for the user account. |
|
Role |
User role: § Viewer – Can list, load and edit, from the client-side, all layers for which the user has valid view/edit access. § Publisher – In addition to all Viewer permissions, a Publisher can also publish layers to SkylineGlobe Server and manage these layers from supporting clients, e.g., TerraExplorer Pro. § Site Administrator – In addition to all Publisher permissions, a Site Administrator can also log in to SGS Manager of a specific site to perform SGS management and configuration activities. This includes management of all the site's services, data sources, layers, groups/users and some site settings. § Super Administrator – A Super Administrator is the only user who can add, delete, and edit properties of server sites. In addition to all Site Administrator permissions, a Super Administrator can also log in to SGS Manager to any of the server's sites to perform SGS management and configuration activities. This includes management of all the server's data sources, layers, groups/users, and settings. |
|
Site |
Server site for this user. See "About Working with Sites" in the "Working with Sites" chapter for information. |
|
Group |
User group. Users can view / edit layers published by other users in the same user group if the respective view / edit permission for the layer was set to "My Group" or "Everyone". |
|
Password |
Type the user password. Click Generate to automatically generate a password. |
|
Click Generate to automatically generate an access token. This property is only displayed if the Role was set to Viewer. Creating an access token for a user enables the user to directly access SGS layers without logging in to SGS. In TerraExplorer Fusion or Desktop, the access token parameter should be appended to the end of your server URL, e.g., https://cloud.skylineglobe.com/sg/TEF/te.html?project=https://cloud.skylineglobe.com/SG/demos/projects/ Note: This property is only displayed for super administrators and site administrators. Note: Generating a token will invalidate any previously generated token for the same user. |
|
|
Storage Used |
GB of storage already in use by this user. Click Refresh to refresh this information. |
|
Max Storage |
Set the limit on storage for this user. The number entered must be lower than the server's Max Storage defined in the SGS license and the Max Storage set for the user's group. |
|
Max Active Sessions |
Set the limit on the number of concurrent clients for this user. The number entered must be lower than the "Max Active Sessions" set for the user's group (in Group Properties) and for the server (defined in each SGS license). See "Monitoring Servers and Services" in the "Monitoring SkylineGlobe Server" chapter and "Adding New User Groups" in this chapter for information. |
|
Allow Notifications |
Select the check box to display a notifications dialog when this user logs in to SGS Manager with information about entities (sites, groups, and users) that have already expired or will be expiring within the next five days. |
|
SG Cloud User |
Reserved. Currently not used. |
4. Click Add.
Editing User Properties
To edit user properties:
1. From the SkylineGlobe Server Manager menu, select Users. The Users page is displayed.
2. Select a user, and click Properties. The User Properties dialog is displayed.
3. Modify the properties as required. See "Adding Users and Setting User Properties" in this chapter for information.
4. Click Calculate to calculate the amount of storage on the server used by this user.
5. Click Save.
Integrating Identity Providers (IdP) in SGS
SkylineGlobe Server features integrated Single Sign-On (SSO) - OpenID user authentication, enabling users to access the server using credentials from either commercial Identity Providers (IdP) like Google Workspace and Facebook, or from enterprise identity provider servers.
Setting up these identity providers involves two main steps:
§ Configuration of the loginAuthSettings.json file to specify the IdPs SGS should recognize and interface with. Each of these properties must be accurately configured to ensure successful integration and communication between SGS and the selected IdPs.
§ Management of the lists of users authorized to access SGS. The approach to managing these lists varies between enterprise and social IdPs. For enterprise IdPs, which are typically used within organizations to manage employee identities, scripts are utilized to synchronize the user list with SGS. This process includes connecting to the enterprise IdP, retrieving user information (ensuring that the user's email address is set as their username), and using the SGS API to create or update user accounts accordingly. For social IdPs like Facebook and Google, management involves developing or implementing checker applications that act as intermediaries, handling the authentication data from the social IdPs and determining whether a user logging in already has an SGS account. Depending on the organization's policies, the checker application might automatically create a new user account in SGS, assign specific permissions, or deny access if the user does not exist.
SGS Login with SSO Authentication
To configure the IdPs that SGS should recognize and interface with:
1. Locate the loginAuthSettings.json file in the SharedConfigurations folder under the Server Configuration Database Folder (whose location was defined during SGS installation), e.g., C:\SkylineGlobeServerConfiguration\SharedConfigurations\. This file includes a property named identityProviders, which is an array composed of objects. Each object represents an identity provider.
2. For each identity provider you want to add, uncomment the lines corresponding to its properties within the identityProviders comma-delimited array.
{
"identityProviders": [
{}
],
"forceIdentityProvider": ""
}
Properties:
|
Name |
Description |
|
name |
Name of IdP, e.g., "Facebook". |
|
loginIcon |
Path to the icon that should be used for the IdP button in the login dialog. |
|
loginUrl |
URL of the IdP that users will be redirected to in order to log in. This information is obtained from the IdP. |
|
authTokenURL |
URL endpoint at which you will receive access tokens from the IdP to authenticate and authorize users for your server. This information is obtained from the IdP. |
|
authTokenURLRequestBody |
Request body to be sent (POST) within the "authTokenURL" request: § client_id: Public identifier for your server. § client_secret: Secret identifier for your server. These are obtained from the IdP: § grant_type: Must be set to "authorization_code". § redirect_uri: SGS URL to redirect to after getting the access token. Example: client_id=XXXXXX&client_secret=YYYYYY& |
|
getUserInfoURL |
URL for retrieving the user profile information (e.g., user name, email). This information is obtained from the IdP. Make sure that the user profile information returned by the IdP uses the user's email address as the username. |
3. After creating/modifying the configuration file, restart SGS for updates to take effect.
Example
{
"IdentityProviders": [
{
"name": "Google",
"loginIcon": "https://skyline.com/SG/temp/Google.png",
"loginUrl": "https://accounts.google.com/o/oauth2/v2/auth?client_id=XXXXX.apps.googleusercontent.com&redirect_uri=https://cloud.skylineglobe.com
%2Fsg%2Foauth%2Fredirect&scope=openid%20email%20profile&response_type=code",
"authTokenURL": "https://oauth2.googleapis.com/token",
"authTokenURLRequestBody": "client_id=XXXXXXX.apps.googleusercontent.com&client_secret=YYYYYY&
grant_type=authorization_code&redirect_uri=https://cloud.skylineglobe.com/sg/oauth/redirect",
"getUserInfoURL": "https://people.googleapis.com/v1/people/me?personFields=names,emailAddresses"
}
],
"forceIdentityProvider": ""
}
To manage the user list for integration of enterprise IdPs with SGS, do the following:
1. Use a custom script to connect with the enterprise IdP and retrieve the list of users and their relevant information, such as names, email addresses, and their roles within the organization.
2. With the user data from the IdP, use the SGS API to bulk create user accounts in SGS and set user properties and permissions.
3. Periodically repeat these steps to reflect any changes in the organization's user base (e.g., new hires, departures).
To manage the user list for integration of social IdPs (e.g., Facebook, Google) with SGS, do the following:
1. Create or implement a third-party checker application that interfaces between the social IdP and SGS. This application should handle the authentication data from the IdP.
2. The checker application should use the SGS API to verify if a user logging in via the social IdP already has an account in SGS and log them in if the user exists. If the user does not exist, the checker application should apply the organization's policy, which may involve creating the user account in SGS, granting specific permissions or denying access.
Sample Script
<html>
<head></head>
<body onload = "init()">
<script language= "JavaScript">
var userName = "newUser";
var Password = "newPassword";
var siteName = "default";
var Role = "Publisher";
function init(){
//debugger;
fetch("http://127.0.0.1/sg/" + siteName + "/ConnectSG", {
"body": "{\n \"request\": \"login\",\n \"username\": \"admin\",\n \"password\": \"password\",\n \"isPersistent\": true\n}",
"method": "POST",}).then((response) =>response.json()).then((response) =>{if(!checkUser(userName))
{addUser(userName, Password, siteName)} else return;
/* if the user exists, redirect to TEF\SG\TED with the known credentials*/})};
functioncheckUser(userName){
//debugger;
fetch("http://127.0.0.1/sg/" + siteName + "/api/v1/user/get?userName=" + userName, {
}).then((response) =>response.json()).then((response) =>{if(response.result == "failed") return false; else return true;});
}
function addUser(userName, Password, siteName){
//debugger;
fetch("http://127.0.0.1/sg/" + siteName + "/api/v1/user/create?userName=" + userName + "&permissionType=" + Role + "&txtNewPW=" + Password, {
}).then((response) =>response.json()).then((response) => {if(response.result == "success")
{/* redirect to TEF\SG\TED with the new credentials*/} else {alert("could not add");
/* redirect to TEF\SG\TED login */return;}});
}
</script>
</body>
</html>
Deleting Users
To permanently delete a user:
1. From the SkylineGlobe Server Manager menu, select Users. The Users page is displayed.
2. Select a row with a specific user, and click Permanently Delete.
Note: Deleting a user also permanently deletes all the user's layers.