Installing/Running SkylineGlobe Server
SkylineGlobe Server offers two options for running SGS: standard installation and installation-free. The installation-free option is available on both Windows and Linux operating systems. Server clusters are supported for all installation options.
§ Installing SkylineGlobe Server
§ Running SkylineGlobe Server Edge for Windows
§ Running SkylineGlobe Server Edge for Linux
Installing SkylineGlobe Server
To install SkylineGlobe Server:
Note: On some operating systems, administrative privileges may be required.
Note: Enable SSL/TLS on the SkylineGlobe Server site to secure SGS. This will allow TerraExplorer Fusion to run, as it operates exclusively over the HTTPS protocol. After installation, modifications to SGS security are performed by manual editing of the Web.config file in the installation folder. See "Managing SGS Security" in this chapter for more information. See here for information on security configuration options for SkylineGlobe Server deployment.
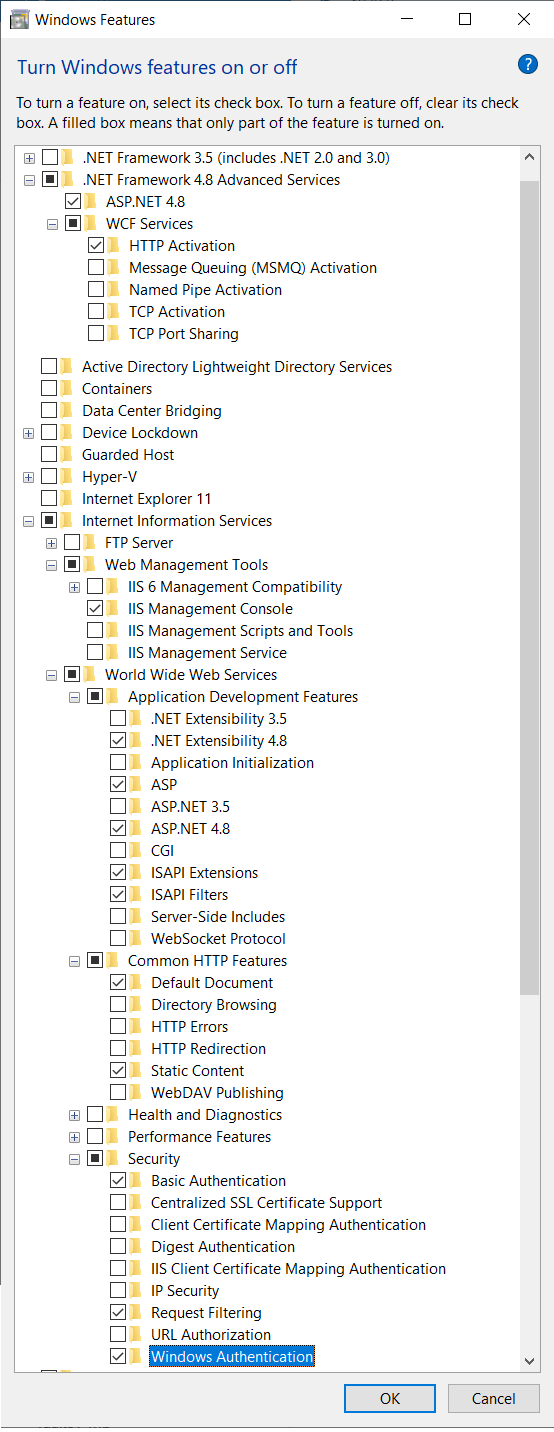
Note: SkylineGlobe Server requires Microsoft Internet Information Services IIS 7.5, IIS 8.5, or IIS 10 with .Net 4.8 and ASP.Net, and the components selected in the figure below. If an error occurred when installing these IIS features, see the following guided walk-through to fix this problem: https://support.microsoft.com/en-us/help/10164/fix-windows-update-errors
1. Place the SkylineGlobe license file (SLSkylineGlobeServer.lic) next to the SkylineGlobeServerSetup.exe file in the installation folder.
2. Double-click the SkylineGlobeServerSetup.exe file. If you are installing SkylineGlobe Server and do not have Internet Information Services, a dialog is displayed informing you that you must first install IIS. Install IIS and restart the installation process. The SkylineGlobe Server Setup dialog is displayed.
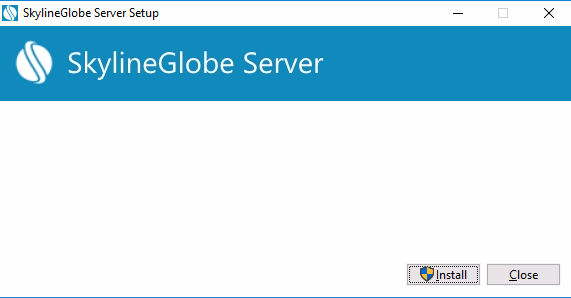
SkylineGlobe Server Setup
3. Click Install. The Welcome dialog is displayed.

SkylineGlobe Setup
4. Click Next. The End-User License Agreement is displayed.
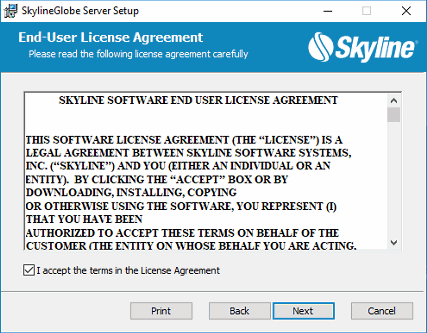
End-User License Agreement
5. Read the License Agreement and then select the I accept… check box.
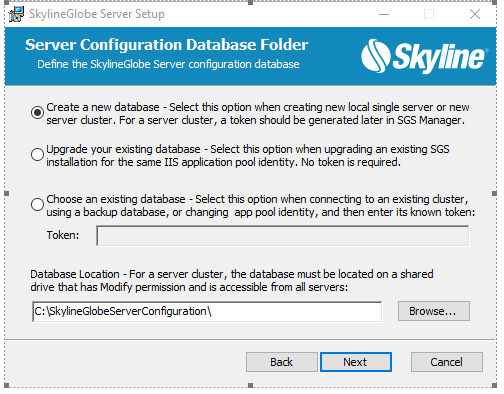
6. Click Next. The Server Configuration Database Folder dialog is displayed.

Server Configuration Database Folder Dialog
7. Select one of the SkylineGlobe Server configuration database options. The option selected depends on the reason for this installation:
Note: All the options below involve a file-based database, i.e., file system. For information on using a PostgreSQL server database, see "Storing SGS Databases on a PostgreSQL Server" in this chapter.
§ If you are installing a new server with a new database – Select Create a new database. This option applies whether you are installing a new single, standalone server or installing a server that will be part of a new server cluster. When creating a new server cluster, the configuration database must be located on a shared drive to which all servers in the cluster have view/edit access. See "What is SkylineGlobe Server" in the "Basic Concepts" chapter for more information.
Note: If you are creating a new server cluster, you will require a known database security token that can be shared with all computers in the cluster to enable them to use the database. This token can be generated after installation in SGS Manager. See "Setting SkylineGlobe Server Settings" in the "SkylineGlobe Server Settings" chapter for information.
§ If you are creating a new server that will be part of an existing server cluster (and therefore use the cluster's existing database) – Select Choose an existing database, and then enter the security token that was generated for this database.
§ If you are creating a new server using a backup database – Select Choose an existing database, and then enter the security token that was generated for this database.
§ If you are upgrading an existing server installation for the same IIS user – Select Upgrade your existing database.
8. Browse to the location of the new or existing database.
Note: When working with a server cluster, the database must be located on a shared drive that has Modify permission and is accessible from all servers.
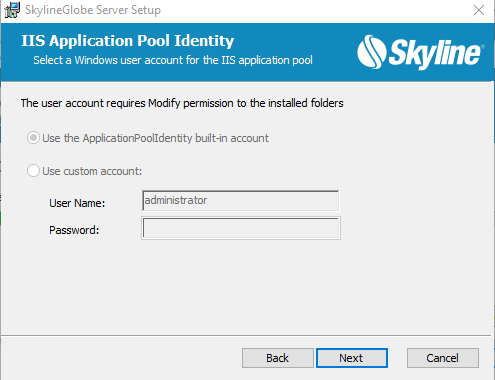
9. Click Next. The IIS Application Pool Identity dialog is displayed.
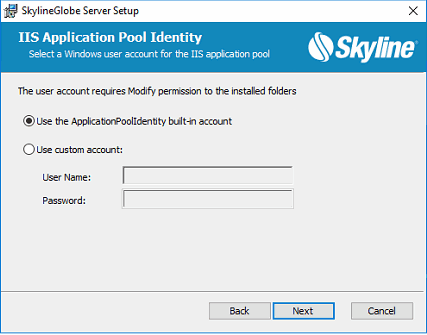
IIS Application Pool Identity Dialog
10. Select a Windows user account for the IIS application pool.
Note: If you are upgrading an existing server installation, make sure to use the same IIS application pool identity as used in the previous installation
11. If using a custom account, enter the User Name and Password.
12. Click Next. The Destination Folder dialog is displayed.
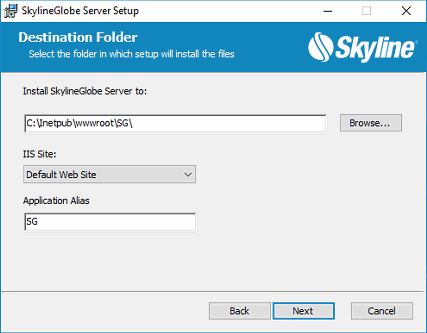
Destination Folder
13. If you want to select a different folder than the default for the SkylineGlobe Server installation, enter the required folder path or click Browse, and browse to the required folder.
Note: The installation folder should be located on the local drive.
14. Select an IIS Site.
15. Type an Application Alias.
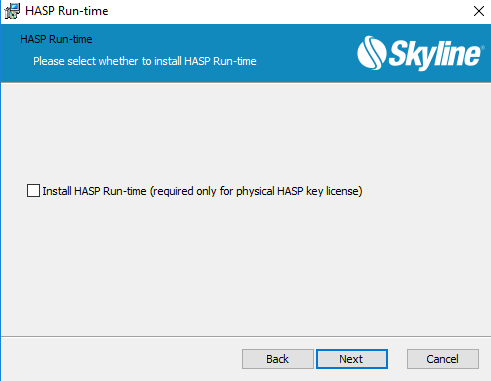
16. Click Next. The HASP Run-time dialog is displayed.
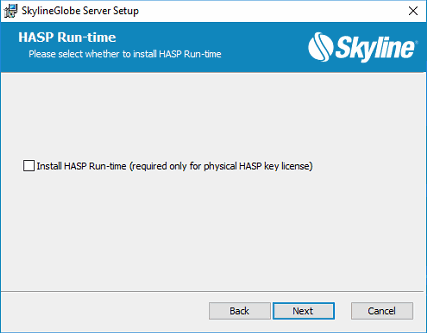
HASP Run-time Dialog
17. If you want to install HASP Run-time, select the check box.
18. Click Next.
19. The Ready to Install SkylineGlobe Server dialog is displayed.
. 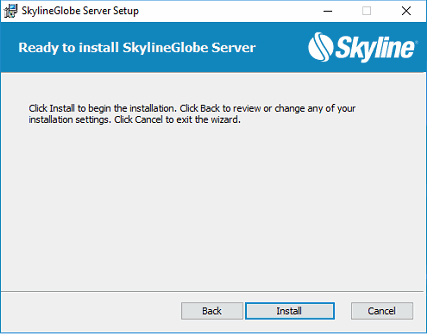
Ready to Install SkylineGlobe
20. Click Install to begin installation. If the application pool user account does not have the necessary permissions to the configuration database folder set in step 6, a dialog is displayed asking if you want to add the permissions. Add the necessary Modify permission to the folder for the application pool user account, and click Retry. If you want to add permissions after installation, click Ignore to complete installation. See "Adding Access Permission for the SGS Installation Folder" in this chapter for information.
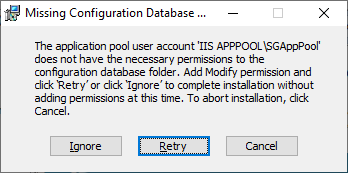
IIS User Access Permissions Dialog
21. A dialog is displayed when the installation is complete. Click Finish.
22. The TerraBuilder Fuser Setup License Agreement is displayed.
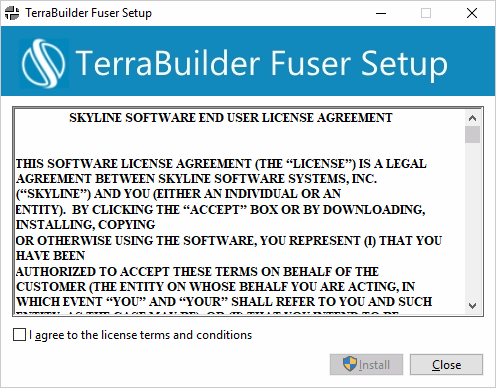
License Agreement
23. Select I agree… and then click Install. A dialog is displayed informing you that the setup process is being initialized. When initialization is complete, the Destination Folder dialog is displayed.
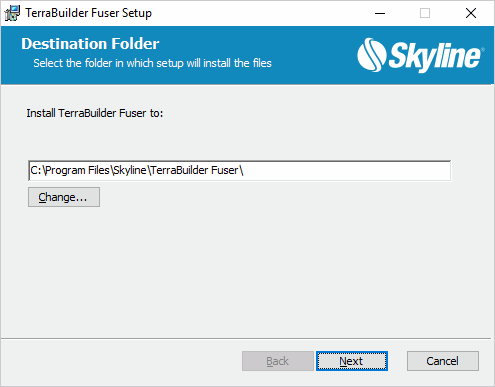
Destination Folder Dialog
24. Select the location of the TerraBuilder fuser installation, and click Next. The Ready to Install dialog is displayed.
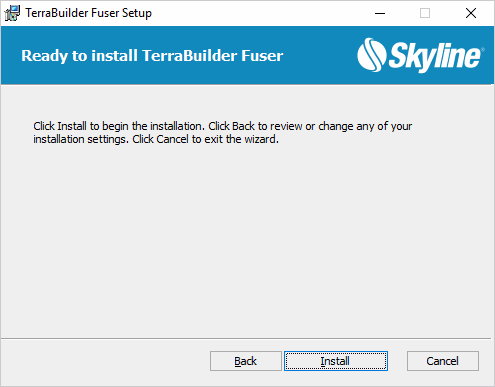
Ready to Install Dialog
25. Click Install to begin installation. A dialog is displayed when the installation is complete.
26. Click Finish.
27. Log in to SGS, and then on the Settings page, in the Public URL field, enter the server URL, e.g., http://your.domain.com/sg. See the "Setting a Public URL" post-installation procedure in the "SkylineGlobe Server Settings" chapter for information.
Running SkylineGlobe Server Edge for Windows
SkylineGlobe Server Edge for Windows provides you with everything you need to run SGS on any Windows platform in an installation-free click and go package, eliminating the requirement of Windows Server or IIS installation. All the necessary components are pre-configured and ready to use.
Note: SkylineGlobe Server Edge may enter sleep mode. To restart, close the running SGSEdge.exe and then double-click the launcher file to reload it.
To run SkylineGlobe Server Edge for Windows:
1. Extract the files from the SGS-Edge.zip package to a directory on your computer.
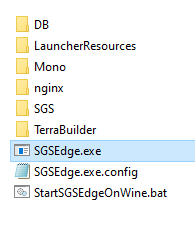
2. Place the SkylineGlobe license file (SLSkylineGlobeServer.lic) in the SGS directory (under the SGS-Edge directory).
Note: If using a floating license, an SLFloat.xml file that includes your server URL and the access token received with your Cloud subscription must be saved next to the SLSkylineGlobeServer.lic file in the SGS directory (under the SGS-Edge directory). To create this file manually, create an XML file called SLFloat.xml, that contains the following line (replace [YOURTOKEN] with the access token received with your Cloud subscription):
<Floating><ServerUrl>https://cloud.skylineglobe.com/sws/[YOURTOKEN]/Client/ClientCalls.aspx</ServerUrl></Floating>
3. If running SkylineGlobe Server Edge for Windows on a single computer, in the SGS Edge directory, double-click the SGSEdge.exe file to run it, and skip to step 5.
4. If running SkylineGlobe Server Edge for Windows on a server cluster, do the following:
a. Set up a PostgreSQL server for storing SGS databases. See "Storing SGS Databases on a PostgreSQL Server" in this chapter for information.
b. In the Web.config file located in the SGS directory, replace the value $CATALOG_DB_FILE$ with the path of the catalog.db. The location should be shared by all the machines in the cluster, e.g., shared disk.
c. On the first machine, double-click the SGSEdge.exe file to run it. Then locate the element <machineKey….. /> in the SGS\Web.config file) and copy it.
d. On all other machines, edit the SGS\Web.config file: Locate the element <machineKey….. /> and replace it with the one copied from the first machine. Then double-click the SGSEdge.exe file to run it.
5. Start SkylineGlobe Server Manager. See "Starting SkylineGlobe Server Manager" in this chapter for more information. The default port for the launcher is 8080, so if working directly on the server computer, open a web browser and enter the following URL: http://localhost:8080/sg. If you want to use a different port, run the following command in the terminal: SGSEdge.exe --sgs_port=xxxx.
6. In the SGS Manager Settings page, set the "Public URL" value. See the "Setting a Public URL" post-installation procedure in this chapter for information.
Note: You can also set the public URL externally using either of the following methods:
· From the command line - Run the following command in the terminal:
SGSEdge.exe --sgs_custom_public_Url=https://domain.com/sg
· In the JSON file - Create a file called "custom_params.json" in the SGS directory (under the SGS-Edge directory) that has the following line:
{ "sgs_custom_publicUrl": "https://domain.com/sg" }
Enabling HTTPS on SkylineGlobe Server Edge for Windows (Using NGINX Server)
SkylineGlobe Server Edge for Windows can only serve content to HTTP clients. For clients that only support HTTPS protocol (e.g., TerraExplorer Fusion), a reverse proxy in front of your server must be set up. Skyline provides a pre-configured NGINX bundle that can be used for this purpose. The following steps guide you on how to deploy it effectively. If you opt for a different proxy server, note that it will necessitate a separate manual configuration process.
Alongside the reverse proxy, an SSL certificate must be installed to allow secure connections over HTTPS.
Note Since TerraExplorer Fusion only supports HTTPS protocol, in an unsecured environment, it cannot run under an IP address tied to a specific domain name (DNS) or machine name. To work around this in a non-secure setting, TerraExplorer Fusion should be run locally (using 127.0.0.1 or localhost), e.g., HTTP://localhost/TEF/TE.html.
The steps below should be performed after running SkylineGlobe Server Edge for Windows.
Do the following:
1. Close SGSEdge.
2. Copy the CRT (SSL Certificate) and Private Key files into the SGS-Edge\nginx\ssl folder.
3. Edit the .\nginx\conf\sgs_windows.conf file under the SGS-Edge directory to configure NGINX to use the SSL certificate and key, by making the following changes:
a. Replace $SERVER_NAME$ with the server domain, e.g., your.domain.com.
b. Replace $CRT_FILENAME$ with the CRT file.
c. Replace $PRIVATE_KEY_FILENAME$ with the name of your Private Key file.
4. Edit the host file: C:\Windows\System32\drivers\etc\hosts; to create a redirect between the HTTP and the HTTPS (DNS).
[localIP]+tab+[DNS]
In the example below, every call to skylineglobe.com/SG/TEF redirects to the local host 127.0.0.1.
127.0.0.1 skylineglobe.com/SG/TEF.
5. Open the command prompt window and navigate to the .\nginx directory. Run the following command to initiate the NGINX proxy server:
.\nginx.exe -c conf\sgs_windows.conf -g "daemon off;"
6. Double-click the SGSEdge.exe file to restart it.
7. Open a browser and type your server URL, e.g., https://your.domain.com/sg
8. Log in to SGS, and then on the Settings page, in the Public URL field, change the server's public URL to https, e.g., https://your.domain.com/sg. See the "Setting a Public URL" post-installation procedure in this chapter for information.
Running SkylineGlobe Server Edge for Linux
Based on SkylineGlobe Server Edge for Windows, SkylineGlobe Server Edge for Linux also requires no installation or web server software. SkylineGlobe Server Edge for Linux has been thoroughly tested and verified on the Ubntu and SUSE distributions, assuring reliable performance. Support for other Linux distributions is also available.
To run SkylineGlobe Server Edge for Linux, perform the following steps:
§ Use NGINX as a Reverse Proxy for HTTPS Clients
Installing Wine
Wine creates a .wine directory in your Linux home folder, featuring a virtual drive_c that emulates a Windows environment, enabling the installation and running of Windows applications, in our case SkylineGlobe Server, within Linux. This structure mimics a typical Windows file system, providing compatibility for many Windows programs on a Linux system.
§ Installing Wine in Ubuntu
§ Installing Wine in SUSE
To install Wine in Ubuntu:
§ Execute each of the following commands in the terminal (See https://wiki.winehq.org/Ubuntu for more information):
Note: You may be asked to restart services during installation. Choose OK if prompted.
sudo dpkg --add-architecture i386
sudo mkdir -pm755 /etc/apt/keyrings
sudo wget -O /etc/apt/keyrings/winehq-archive.key https://dl.winehq.org/wine-builds/winehq.key
sudo wget -NP /etc/apt/sources.list.d/ https://dl.winehq.org/wine-builds/ubuntu/dists/jammy/winehq-jammy.sources
sudo apt-get update
sudo apt-get -y install --install-recommends winehq-staging #wine-9.0-rc2
wineboot
To install Wine in SUSE:
§ Execute each of the following commands in the terminal:
Note: When running sudo zypper refresh, choose 'a' if you're asked during the process to choose an option.
sudo zypper install dpkg
sudo dpkg --add-architecture i386
sudo mkdir -pm755 /etc/apt/keyrings
sudo wget -O /etc/apt/keyrings/winehq-archive.key https://dl.winehq.org/wine-builds/winehq.key
sudo zypper addrepo https://download.opensuse.org/repositories/Emulators/15.4/Emulators.repo
sudo zypper refresh # Choose 'a' when prompted.
sudo zypper install wine-9.0~rc2-lp154.1070.1.x86_64 # Choose solution number '2' in the menu.
wineboot
Installing and Running SGS Edge
To install:
1. Open the terminal, and type the following command to navigate to the Wine C Drive:
cd ~/.wine/drive_c
2. Download SGS-Edge.zip from the provided URL using the following command:
wget 'https://[URL]/SGS-Edge.zip'
3. Install an Unzip Tool (If not already installed). Depending on your Linux distribution, use one of the following commands:
§ Ubuntu:
sudo apt-get -y install unzip
§ SUSE:
sudo zypper install unzip
Note: You may be asked to restart services. Select OK if prompted.
4. Unzip the downloaded file using the following command:
sudo unzip SGS-Edge.zip
5. Grant read, write, and execute permissions to the user, group, and others for the 'SGS-Edge' directory and all its contents:
sudo chmod -R ugo+rwx SGS-Edge
6. Place the SkylineGlobe license file (SLSkylineGlobeServer.lic) in the SGS directory (under the SGS-Edge directory).
Note: If using a floating license, an SLFloat.xml file that includes your server URL and the access token received with your Cloud subscription must be saved next to the SLSkylineGlobeServer.lic file in the SGS directory (under the SGS-Edge directory). To create this file manually, create an XML file called SLFloat.xml, that contains the following line (replace [YOURTOKEN] with your access token received with your Cloud subscription): Note
<Floating><ServerUrl>https://[URL]/sws/[YOURTOKEN]/Client/ClientCalls.aspx</ServerUrl></Floating>
7. If running SkylineGlobe Server Edge for Linux on a single computer, do the following:
a. In the terminal, navigate to the SGS-Edge directory and then run the batch file provided with SGS Edge, which is intended to start the SGS application:
cd ~/.wine/drive_c/SGS-Edge
./Start_SGSEdgeOnLinux.sh & disown
b. After running the Start_SGSEdgeOnLinux.sh script, access SGS via the default URL: http://localhost:8080/sg. Note the lower case sensitivity on the sg. To change the default port, follow these steps:
i. Ensure you're in the correct directory (~/.wine/drive_c/SGS-Edge). Open the Internal_SGSEdgeStart.bat in Vim for editing.
vim ./Internal_SGSEdgeStart.bat
ii. Add the following line to change the port to your desired port number:
"%~dp0\Mono\bin\mono.exe" %MONO_OPTIONS% "%~dp0\SGSEdge.exe" --sgs_port=[desired port number] %*^
iii. Save the changes and exit the editor.
c. To stop SGS, navigate to the SGS-Edge directory in the terminal, and run the following command:
cd ~/.wine/drive_c/SGS-Edge
./Stop_SGSEdgeOnLinux.sh
8. If running SkylineGlobe Server Edge for Linux on a server cluster, do the following:
Set up the First Instance
a. Install a Network File System (NFS) kernel server to create a shared directory (in this case, the 'DB' directory within the SGS installation) that all instances in the cluster can access and modify.
· Ubuntu:
sudo apt-get -y install nfs-kernel-server
· SUSE:
sudo zypper install nfs-kernel-server
b. Configure a shared directory: Open the NFS exports file in Vim to add the DB directory to the list of shared resources:
sudo vim /etc/exports
c. Edit the NFS exports file: Press Insert on your keyboard to start editing, and then add your line:
· Ubuntu:
/home/ubuntu/.wine/drive_c/SGS-Edge/DB *(rw,sync,no_subtree_check)
· SUSE:
/home/ec2-user/.wine/drive_c/SGS-Edge/DB *(rw,sync,no_subtree_check)
d. Press Esc on your keyboard to exit insert mode.
e. Type ':x' and press Enter on your keyboard to save the file and exit Vim.
f. Restart NFS Server:
sudo systemctl restart nfs-server
g. Run SGS:
cd ~/.wine/drive_c/SGS-Edge
./Start_SGSEdgeOnLinux.sh & disown
Set up Additional Instances in the Cluster
a. On each of the additional instances, you need to install NFS client utilities to allow the instance to access the shared NFS directory.
· Ubuntu:
sudo apt-get -y install nfs-common
· SUSE:
sudo zypper install nfs-common
b. Change to the directory where SGS is installed or where you want it installed:
cd ~/.wine/drive_c/SGS-Edge
c. If a local 'DB' directory already exists, rename or move it to back it up. This is to ensure no conflicts with the shared 'DB' directory.
mv DB DB-BACKUP
d. Create a new 'DB' directory to mount the shared NFS directory:
mkdir DB
e. Mount the shared 'DB' directory from the primary instance. Replace [First_Instance_IP] with the IP address of the primary instance and adjust the path according to your setup.
· Ubuntu:
sudo mount -t nfs [First_Instance_IP]:/home/ubuntu/.wine/drive_c/SGS-Edge/DB ~/.wine/drive_c/SGS-Edge/DB
· SUSE:
sudo mount -t nfs [First_Instance_IP]:/home/ec2-user/.wine/drive_c/SGS-Edge/DB ~/.wine/drive_c/SGS-Edge/DB
f. Similar to the first instance, start the SGS application. These commands do the following: (1) suppress all debug messages from Wine, making the output cleaner, (2) run the SGS Edge batch file using Wine, which allows Windows applications to run on Linux, and finally, (3) run the command in the background and disown it from the terminal, so SGS continues to run even if the terminal is closed.
cd ~/.wine/drive_c/SGS-Edge
./Start_SGSEdgeOnLinux.sh & disown
Using NGINX as a Reverse Proxy for HTTPS Clients
SkylineGlobe Server Edge for Linux natively supports HTTP. To serve content over HTTPS, implement NGINX as a reverse proxy. This setup allows HTTPS clients, like TerraExplorer Fusion, to securely connect to the server.
To configure a load balancer with NGINX as a reverse proxy:
1. Copy your SSL certificate and private-key files into ~/.wine/drive_c/SGS-Edge/nginx/ssl. These certificates enable secure HTTPS connections. Replace [your-certificate] and [your-private-key] with your actual file names.
cp [your-certificate].crt ~/.wine/drive_c/SGS-Edge/nginx/ssl
cp [your-private-key].txt ~/.wine/drive_c/SGS-Edge/nginx/ssl
2. Navigate to the NGINX directory:
cd ~/.wine/drive_c/SGS-Edge/nginx.
3. Open the NGINX configuration file (sgs_linux.conf) with Vim:
sudo vim conf/sgs_linux.conf.
4. Configure SSL and gateway settings: Press Insert on your keyboard to edit (this switches Vim to insert mode, allowing you to edit the file). Locate the server block in your configuration file and configure SSL by replacing the following variables with your specific details:
§ SERVER_NAME$ with your external hostname (e.g., my.host.com).
§ $CRT_FILENAME$ with your certificate (.crt) file name.
§ $PRIVATE_KEY_FILENAME$ with your private key file name.Press Esc on your keyboard to exit insert mode. Then type :x and press Enter to save the changes and exit Vim.
5. Press Esc on your keyboard to exit insert mode. Then type :x and press Enter to save the changes and exit Vim.
6. Start NGINX as a reverse proxy, directing HTTPS traffic to the SkylineGlobe Server.:
export WINEDEBUG=-all; wine nginx.exe -c conf/sgs_linux.conf -g "daemon off;" & disown
7. To stop NGINX:
sudo pkill nginx.exe
Silent Installation of SkylineGlobe Server
Skyline also offers a silent installer for SkylineGlobe Server (SGS) that includes two components, each of which should be installed separately:
SGSOnlySetup.exe
To install:
1. Open a command prompt and run the command:
SGSOnlySetup.exe /quiet
Note: Place the license file in the same directory as the installation executable (.exe) file before calling this command.
2. Include any of the following parameters:
Note: Default values are in brackets [].
§ CONFIGURE_IIS_YES_NO [1] – Defines whether to use the ApplicationPoolIdentity user account or create a new one:
· 0 – Use ApplicationPoolIdentity account.
· 1 – Use custom account.
IIS Application Pool Identity Dialog
§ USERNAMEPROPERTY – Set user name. Set this parameter if the Use custom account [1] value was set for the parameter above.
§ PASSWORDPROPERTY – Set password. Set this parameter if the Use custom account [1] value was set for the parameter above.
§ INSTALLFOLDER [C:\inetpub\wwwroot\SG] – Defines the installation folder.
§ DB_NEW_OR_EXISTING [1] – Defines the SGS configuration database:
· 0 – Choose an existing database. If using this option, set the database's token.
· 1 – Create a new database.
· 2 – Upgrade database. TARGETDB_DIR must be provided if selecting this option.
§ TARGETDB_DIR [C:\SkylineGlobeConfiguration] – The path to the SkylineGlobe database and uploads directory.
Server Configuration Database Folder Dialog
§ TOKENSTRING – Use this parameter if the selected value of DB_NEW_OR_EXISTING is 0. When connecting to an existing cluster, using a backup database, or changing app pool identity.
§ ALIAS [SG] – The alias name of the application in the IIS.
§ IIS_WEBSITENAME – The name of the website as it appears under Sites in IIS Manager.
§ HASPCHECKCHECKBOX – Toggle on the HASP checkbox.
HASP Run-Time Dialog
Example:
SGSOnlySetup.exe /quiet CONFIGURE_IIS_YES_NO=1 USERNAMEPROPERTY=user1 PASSWORDPROPERTY=passwordTest INSTALLFOLDER=C:\SG TARGETDB_DIR=D:\SkylineGlobeConfiguration
In the script above, SGS is installed under a custom user (CONFIGURE_IIS_YES_NO=1) into a custom folder (INSTALLFOLDER=C:\SG) and its database will be operated in a custom directory (TARGETDB_DIR=D:\SkylineGlobeConfiguration).
Note: When using floating licenses, an SLFloat.xml file, with the URL of the SFLS server, must be manually copied to each client machine's installation root folder. This URL is normally set on the client side using the License Manager tool. To create this file manually, create an XML file called SLFloat.xml, that contains the following line:
<Floating><ServerUrl>https://[SERVERIP]/sfls/Client/ClientCalls.aspx</ServerUrl></Floating>
To uninstall:
§ Type the following command in the command prompt window:
SGSOnlySetup.exe /quiet /uninstall
TerraBuilderFuser.exe
To install:
1. Open a command prompt and run the command:
TerraBuilderFuserSetup.exe /quiet
2. The following parameter can be included. Default values are in brackets [].
§ INSTALLFOLDER – [C:\Program Files\Skyline\TerraBuilder] – Defines the installation folder.
Example:
TerraBuilderFuserSetup.exe /quiet INSTALLFOLDER=C:\SkylineProducts
In the script above, the TerraBuilderFuserSetup will be installed under a custom folder (INSTALLFOLDER=C:\SkylineProducts).
To uninstall:
§ Type the following command in the command prompt window:
TerraBuilderFuserSetup.exe /silent /uninstall
Uninstalling SkylineGlobe Server
The Uninstall feature lets you remove all folders and files that you installed to your hard disk during the installation procedure.
Note: If you also want to uninstall the TerraBuilder fuser that was installed as part of the SkylineGlobe Server installation process, repeat these steps for TerraBuilder fuser.
Note: The server's configuration database is not removed during the uninstall process.
To uninstall SkylineGlobe Server:
1. Exit SkylineGlobe Server Manager.
2. On the Control Panel click >Programs >Uninstall a Program.
3. Select SkylineGlobe Server, and then click Uninstall.
4. Click Uninstall on the Confirm Uninstall message.
5. Follow the on-screen instructions until all SkylineGlobe Server Manager files are removed.
Storing SGS Databases on a PostgreSQL Server
Each of SGS's three main databases: catalog, catalog_messages, and catalog_sgstatistics is stored in a separate SQLite file. For greater reliability when working in a multi-server environment and to support a higher number of users and requests, these databases can be stored on a PostgreSQL server, including Amazon Aurora (a PostgreSQL compatible database built for the cloud).
To store SGS databases on a PostgreSQL server:
1. Install SGS. See "Installing/Running SkylineGlobe Server" in this chapter for more information.
2. Install the following:
§ PostgreSQL Server (if not already installed) – This can be installed on your computer, network server, or Amazon Aurora.
§ pgAdmin 4. See "https://www.pgadmin.org/download/" for more information.
3. In pgAdmin, do the following for each of the three main databases: catalog, catalog_messages, and catalog_sgstatistics, that you are creating:
a. In the navigation pane, right-click Databases, and in the shortcut menu select Create > Database. The Create Database dialog is displayed.
b. On the General tab in the Database field, type the corresponding catalog name (catalog, catalog_messages, or catalog_sgstatistics), and click Save.
c. In the navigation pane, right-click catalog (under Databases), and select Query Tool. The Query Editor is displayed.
d. Copy and paste the respective catalog script content (located in the .\SG\Resources\DB_Scripts folders) into the Editor, and click Execute/Refresh (F5) ![]() .
.
4. Edit the Web.config file located in the application's installation folder:
a. Set the value of the "CatalogDBType" key to "postgresql".
b. Set the value of the "CatalogPostgreSqlConnString" key (server, port, uid, and password parameters). Do not modify the database parameter.
E.g.,
<add key="CatalogDBType" value="postgresql"/>
<add value="C:\SkylineGlobeServerConfiguration\catalog.db" key="CatalogConnPath"/>
<add key="CatalogPostgreSqlConnString" value="server=192.168.202.1;port=3306;database={0};uid=admin;pwd=admin;"/>