Work with Layers
In TerraExplorer Fusion Plus, you can load layers from the SkylineGlobe Server, display them, and edit their properties. Additionally, you have the option to publish to SkylineGlobe Server drawing objects and layers that you've added to the "My Data" section. This content can be published either on its own or together with the base project.
Load Layers from SkylineGlobe Server
You can load any layer type from SkylineGlobe Server: 3DML, elevation, feature, imagery, or point cloud. These layers are added to the side toolbar's Layers tab and Project Tree tab. Feature layers with complex geometries, i.e., multi-polygons, multi-lines, and multi-points, are supported. Loading and editing layers from SGS is only supported in TerraExplorer Fusion Plus.
You must be logged in to a SkylineGlobe Server to load a layer. See "Logging in to SGS" for more information.
To load a layer from SkylineGlobe Server:
1. On the side toolbar > ![]() > Load Layers from SkylineGlobeServer > Select the layer type.
> Load Layers from SkylineGlobeServer > Select the layer type.
2. In the SkylineGlobe Layers dialog box, search for the required layer.
3. The properties dialog box is displayed. The specific properties displayed depend on the layer type. See below for information. Edit as required and then click Close to save your changes. All layers loaded from SGS are added to the My Data section of the Layers panel.
To search for a SkylineGlobe layer:
1. Do either of the following:
a. To search for layers whose property information contains a specific string, do the following:
i. In the Search String field, type a search string and click Search.
ii. If you want to perform an advanced search, click Advanced. Enter an attribute, condition, and value and click Insert String ![]() . The search expression is displayed in the Search String field. Select a connector:
. The search expression is displayed in the Search String field. Select a connector: ![]() to include additional strings.
to include additional strings.
b. To search according to geographic location:
i. Click Advanced.
ii. Click Set Bounding Box, and select the required region by drawing a rectangle on the map on the right side of the page around the area to which the search is confined.
iii. From the Map field, select Contained - to search only for layers whose entire geometry fall within the bounding box OR Intersect – to search for all layers whose geometry intersect at any point with the bounding box.
2. Click Search.
Attribute and Spatial Queries
Feature layers can be queried by attribute or based on spatial relationship with a polygon or selection point.
To query feature layers by attribute:
1. On the side toolbar > ![]() > right-click the layer you want to query > Select and Query. The Query panel is displayed.
> right-click the layer you want to query > Select and Query. The Query panel is displayed.
2. To see attribute information and perform a search by attribute, do the following:
a. Click Attributes. The Attribute Table is displayed.
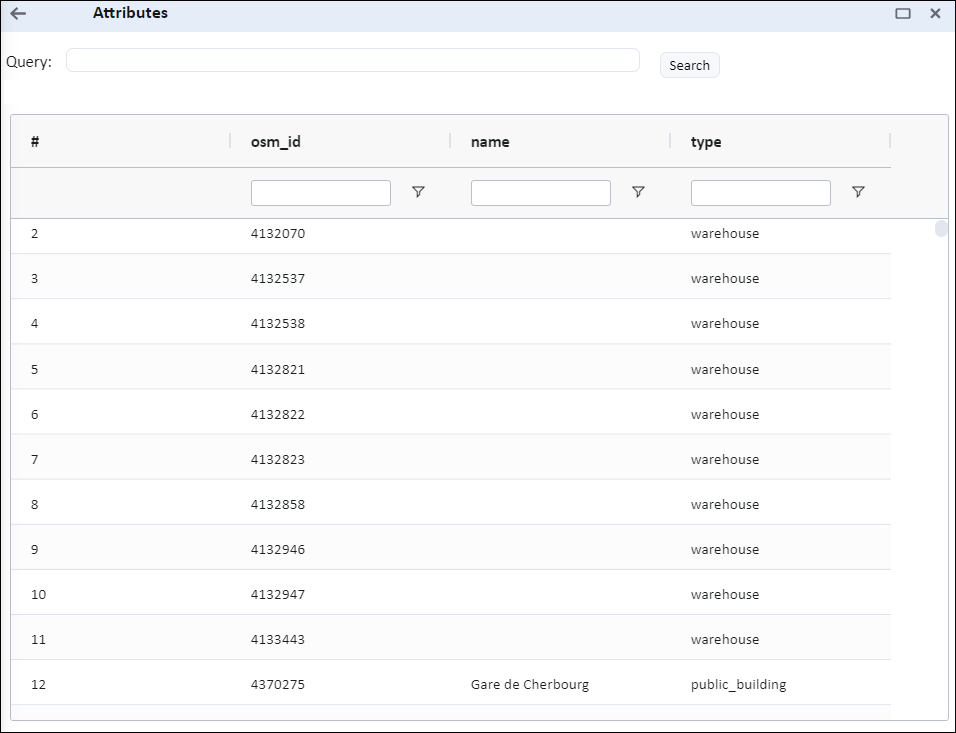
b. In the Search query field, enter an attribute, operator, and value and click Search. Your search results are displayed in the search results list. A maximum of 200 features are displayed. To fly to a feature, double-click the feature's row in the attribute table.
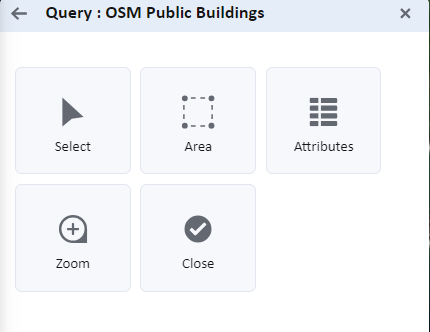
3. To perform a spatial query, do the following:
a. Select either of the following from the Query panel:
· Select – Select the feature that is clicked.
· Area – Select all features that are spatially related to the polygon that will be drawn.
b. In the 3D Window, do one of the following depending on the type of spatial query:
· Point selection – Place a single point in the 3D Window by clicking in the desired location.
· Area selection – Place the polygon points in the 3D Window by clicking in the desired locations. You must place at least three points. Finish the polygon creation by right-clicking.
The Attribute Table is displayed showing the selected features.
4. Toggle off the spatial query command when you want to turn off the query.
Edit Feature Layer Properties
You can edit the properties of "My Data" layers that you have loaded into the project and have Edit access to.
To edit basic layer and feature properties from the layer's property sheet:
1. On the sidebar > ![]() > right-click the layer you want to edit > Properties. The layer's property sheet is displayed.
> right-click the layer you want to edit > Properties. The layer's property sheet is displayed.
2. Edit the layer properties as required. The specific properties displayed depend on the feature layer type.
|
Property |
Description |
|
Description |
Name of layer. |
|
Text |
For point layers represented by a label, the label text. |
|
Text Color |
Sets the foreground color of the text |
|
Icon |
For point layers represented by an icon, URL to the icon file (points). |
|
Icon Color |
For point layers represented by an icon, the background color of the image. Click the color bar to open the Color dialog box, where you can select a color (points). |
|
Line Width |
Line width in pixels (1-5) (polygons and polylines). Note: When layers published in TerraExplorer Pro are loaded into your project: all meter values are displayed as 1 pixel wide. |
|
Line Color |
Outline color for each of the layer's features (polygons and polylines). Click the color bar to open the Color dialog box, where you can select a color. |
|
Line Opacity |
Line opacity (polygons and polylines). |
|
Fill Color |
Fill color for the layer's features (polygons). Click the color bar to open the Color dialog box, where you can select a color. |
|
Fill Opacity |
Opacity for the object's fill. |
|
Altitude Method |
Sets the altitude method to be used by the layer: § Select Relative to Ground to place each point of the layer at a specified altitude above the ground, defined by its Altitude Offset (polygons, polylines, points). § Select Above Sea Level to place each point according to its elevation relative to mean sea level. § Select Drape on Terrain to create the layer on the terrain. |
|
Altitude Offset |
Specified altitude above the ground to place each point of the layer. This property is only available for polygons and polylines if "Relative to Ground" or "Above Sea Level" were selected as the Altitude Method. |
|
Visibility Distance |
Sets the maximal distance from the camera above which the layer features disappear. |
|
Line to Ground |
Adds a line from the label's pivot point to the ground (points) |
|
Tooltip |
Text to display when the mouse cursor is placed over the layer in the 3D Window. |
|
Message |
The message displayed when clicking on a feature. |
3. Click Close.
Edit Mesh Layer Properties
You can edit the properties of "My Data" layers that you have loaded into the project and have Edit access to.
To edit:
1. On the sidebar > ![]() > right-click the layer you want to edit > Properties. The layer's property sheet is displayed.
> right-click the layer you want to edit > Properties. The layer's property sheet is displayed.
2. Edit the layer properties as required.
|
Property |
Description |
|
Description |
Name of layer. |
|
Quality |
The mesh layer's Level of Detail (LOD). |
|
Scale |
Determines the dimensions, of the mesh layer. The actual size of the model in the 3D World is the size of the model in its internal coordinate system times the Scale value, (i.e., if the model has a width of 5 units and the scale is set to 10, the width of the object in the 3D World is 50 meters.) |
|
Altitude |
The altitude for the 3DML's pivot point. |
|
Replace Terrain |
Determines whether terrain imagery and elevation in the mesh area is replaced with the 3DML's ground layer (created in 3DML from PhotoMesh) or with the mesh's lower resolution data (Simplified Mesh), or not replaced at all. |
|
Display Style |
Select a mesh model display style. The mesh model can include a wireframe and be textured, solid color, or semi-transparent (x-ray). § Texture § X-ray - Semi-transparent model, enabling you to see through all model walls § Solid color |
3. Click Close.
Edit Point Cloud Layer Properties
You can edit the properties of "My Data" layers that you have loaded into the project and have Edit access to.
To edit:
1. On the sidebar > ![]() > right-click the layer you want to edit > Properties. The layer's property sheet is displayed.
> right-click the layer you want to edit > Properties. The layer's property sheet is displayed.
2. Edit the layer properties as required.
|
Property |
Description |
|
Description |
Name of layer. |
|
Point Size |
Size, in pixels, of each of the point cloud's points. |
|
Point Color |
Color of the point cloud points. |
|
Intensity Blend |
Determines how much the point cloud's intensity value is factored in colorizing the point cloud, where 0% colorizes the point cloud model by point color only, and 100% colorizes by intensity only. |
|
Flatten Terrain |
Determines if the terrain under the model is leveled to the point cloud's elevation value. |
|
Altitude Method |
Sets the altitude method to be used by the layer: § Select Relative to Ground to place each point of the layer at a specified altitude above the ground, defined by its Altitude Offset (polygons, polylines, points). § Select Above Sea Level to place each point according to its elevation relative to mean sea level. § Select Drape on Terrain to create the layer on the terrain |
|
Altitude |
Enter the altitude, as defined in Altitude Method, for the point cloud model's pivot point. |
3. Click Close.
Edit Imagery and Elevation Layer Properties
You can edit the properties of "My Data" layers that you have loaded into the project and have Edit access to.
To edit:
1. On the sidebar > ![]() > right-click the layer you want to edit > Properties. The layer's property sheet is displayed.
> right-click the layer you want to edit > Properties. The layer's property sheet is displayed.
2. Edit the layer properties as required.
|
Property |
Description |
|
Description |
Name of layer. |
|
Remove Null Value |
Select Yes to display the color or elevation data whose value is nullified. Select No to keep the selected value nullified. |
|
Null Value |
Nullify a color value in an imagery layer or an elevation value in an elevation layer: § Imagery Layer - Nullify a color value to make the underlying terrain visible in places that are colored with the nullified color value. § Elevation Layer - Nullify an elevation value to cancel the value's elevation effect. |
|
Null Tolerance |
Enter the permissible deviation from the specified Null value when the color value is irregular. |
3. Click OK.
Add a Feature to a Layer
You can add a feature to "My Data" feature layers that you have loaded into the project and have Edit access to.
To add a feature to a layer:
1. On the sidebar > ![]() > right-click the layer you want to edit > Edit. The Edit dialog is displayed.
> right-click the layer you want to edit > Edit. The Edit dialog is displayed.
2. Click Add [Polyline, Point, or Polygon].
3. In the 3D Window, place the object's points by clicking in the desired location. You must place at least two points for a polyline and three points for a polygon. Finish the object insertion by right-clicking.
4. The Feature property sheet opens. Set the attributes of the geographic feature [polyline, point, or polygon].
5. To move the feature nodes in the XY plane, click ![]() . To move the feature nodes in the Z plane, click
. To move the feature nodes in the Z plane, click ![]() .
.
6. In the 3D Window, place the cursor over one of the feature's nodes. The node turns orange, and the cursor changes to Move mode ![]() .
.
7. Click the node and drag it to the required location. Release the mouse button to set the node at the current location.
Determine What Layers and Objects Are Displayed and Fly to Them
To display and delete layers/objects:
§ On the side toolbar > ![]() > on the Project Tree or Layers tabs > select the checkmarks of the layers/objects you want to display.
> on the Project Tree or Layers tabs > select the checkmarks of the layers/objects you want to display.
Only layers that you have added to the project can be deleted.
§ To delete a layer, on the side toolbar > ![]() > My Data section, right-click the layer you want to delete, and then select Delete.
> My Data section, right-click the layer you want to delete, and then select Delete.
Fly/Jump to a Layer:
§ On the side toolbar > ![]() > on any of the tabs > double-click the layer/object you want to fly to. You can also right-click the layer and select Fly to Object or Jump to Object.
> on any of the tabs > double-click the layer/object you want to fly to. You can also right-click the layer and select Fly to Object or Jump to Object.
Publish to SkylineGlobe Server
Share your added content from the "My Data" section, either by itself or together with the base project. If the entire project is published, it can be opened in another project by specifying it in the project URL or using the "Open another project" command. If only "My Data" was published, it can subsequently be loaded into a project from the Add Content > Project layer command. Publishing data to SGS is only supported in TerraExplorer Fusion Plus.
To publish:
1. On the side toolbar > ![]() > Share My Data > Share.
> Share My Data > Share.
2. Enter the following information:
§ Publish – Select whether to publish the entire project or only your "My Data" section.
§ Name – Type a name for the published project.
§ View Permission – Set the view permission level for this data, i.e., the users granted view access (Only Me, My Group, My Site, or Everyone).
3. Click Share.
Clip Mesh Model
You can clip the mesh model heightwise using the following steps:
1. On the side toolbar > ![]() > right-click the mesh model you want to clip. The Clip dialog is displayed.
> right-click the mesh model you want to clip. The Clip dialog is displayed.
2. To adjust the clipping height, drag the slider left or right as needed.