Fuser Management (on the client computer)
The owner of the fuser computer has full control over fuser usage. For information on installing and uninstalling fusers, see "Installing PhotoMesh Fusers" and "Uninstalling PhotoMesh Fusers" in the "Getting Started" chapter. Fusers can be installed locally, or run from a shared network path.
Setting the Working Folder on a Client Computer
The working folder is the folder that PhotoMesh Build Manager (on the master computer) and PhotoMesh fusers use to communicate: to deposit and collect pending tasks, and share information about fuser availability, status and progress.
The working folder on each of the client computers must be set to the same network folder as was set for the master computer. See "Setting the Working Folder (on the Master Computer)" in this chapter for more information.
To set the working folder on the client computer:
1. In the system tray, click the PhotoMesh Fuser icon, and then click Open PhotoMesh Fuser. The PhotoMesh Fuser dialog is displayed.
2. To the right of the Working Folder field, click Change. The Select Folder dialog is displayed.
3. Browse to the required folder and click Select Folder.
Note: If the working folder is changed during processing, processing is stopped.
Starting Fusers
Once a fuser is started on a client computer, it is added to the list of available fusers on the master computer. Fusers can be installed locally, or run from a shared network path.
To start a fuser:
§ Click Start > Skyline PhotoMesh > PhotoMesh Fuser. A PhotoMesh fuser icon is placed in the Windows system tray.
Note: In the full PhotoMesh installation, the name of the folder containing the fuser application is Skyline PhotoMesh, while in the standalone fuser installation, the folder name is Skyline PhotoMesh Fuser.
Fuser Log
To open the fuser log:
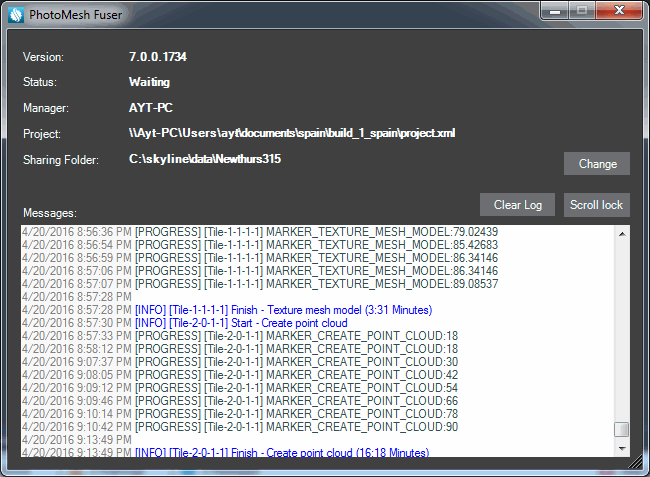
1. In the system tray, click the PhotoMesh Fuser icon, and then click Open PhotoMesh Fuser. The PhotoMesh Fuser dialog is displayed, showing the fuser log in the lower half of the dialog.
2. If you want to clear the log, click Clear Log.
3. If you want to stop the log from automatically scrolling to the last line of the log, click Scroll Lock.
Disabling a Fuser
Fusers can be temporarily disabled.
To disable a fuser:
§ In the system tray, click the PhotoMesh Fuser icon, and then click Disable. When you want to restart the fuser, click the PhotoMesh Fuser icon and then click Enable.
Note: The Master computer reattempts to use the fuser every five minutes. The fuser is used only if its owner has enabled it.
Exiting a Fuser
You can permanently exit a fuser.
To exit a fuser:
§ In the system tray, click the PhotoMesh Fuser icon, and then click Exit.

PhotoMesh Fuser Log
Running Fusers Upon Login
You can schedule fusers to be run automatically upon login, either individual fusers or the fuser service (PMFuserService.exe), if using a fusers pool. See "Fusers Pools" in this chapter for information.
To run fusers upon logon using the Task Scheduler
1. Right-click Task Scheduler Library and select Create Task.
2. General > Name: Start PM Fuser OR Start PM Fuser Service.
Note: If using a fusers pool, then start the fuser service (PMFuserService.exe) rather than a fuser. See "Fusers Pools" in this chapter for information.
3. Triggers:
a. Click New.
b. Begin the task: Select At log on.
c. Settings: Specific user.
d. Click OK.
4. Actions:
a. Click New.
b. Program/script: \\10.0.0.10\d\PhotoMesh\fuser\PhotoMeshFuser.exe OR \\10.0.0.10\d\PhotoMesh\fuser\PMFuserService.exe.
Note: If using a fusers pool, then run the fuser service (PMFuserService.exe) rather than a fuser. See "Fusers Pools" in this chapter for information.
c. Click OK.
5. Settings:
a. Select if the task fails, restart every, and keep the default 1 minute and 3 times.
6. Click OK.
If you want to log in automatically upon start up, do the following:
1. Click the Start ![]() button, type "cmd", and then select Command Prompt from the list. In the command prompt window type the following:
button, type "cmd", and then select Command Prompt from the list. In the command prompt window type the following:
control userpasswords2
2. Select the user that you want automatically logged in, e.g., Administrator, and clear the Users must enter a user name and password to use this computer checkbox, and click OK.
3. Enter and confirm the password for the fuser computer.