Adding Photos

Add Photos Wizard
Photos are added to the project using the Photos Wizard. The following methods are available:
§ Load one or more photos or a folder of photos from your file system. Read external photo orientation and internal camera parameters from the Exif tags.
§ Load an Excel, XML, or CSV file that references the photos and includes external photo orientation and internal camera parameters.
§ Extract individual frames from video and save them as image files.
§ Load a PhotoMesh project. When a PhotoMesh project (.PhotoMeshXML) is loaded into a second project, only the project’s photos and photo and collection parameters are loaded.
§ Import photos from INPHO, BINGO, or Stellacore files with calculated aerotriangulation data and internal camera parameters. See "Importing Photos with Metadata" in this chapter.
Photos can only be loaded when Review mode is off. See "About Reviewing Your Build" in the "Reviewing Your Build" chapter for more information about Review mode.
After photos are added, they are automatically validated. This process checks for any missing data, such as focal length, sensor width/pixel size, or coordinate system information. It also verifies the validity of photo properties, such as photo dimensions, focal length value, and principal point (not too far from photo center). If discrepancies are detected, a warning or error symbol is displayed in the Project Tree to alert you to view and correct the issues. For more information on the specific problem, you can click the warning/error symbol to open a comprehensive Quality Report. See "Viewing a Quality Report" in the "Reviewing Your Build" chapter for more information. If only photos were added and no build was yet performed, the report will only contain the relevant sections.
Loading Photo Files from Disk
For optimal performance, photographs should be divided into one or more collections, homogeneous groups of photographs, all taken by the same physical camera with identical focal length and principal point.
To select photo files from your local disk:
1. On the Home tab, in the Add group, click Photos, and then select one of the following from the Add Photos Wizard:
§ Load Photos – To add selected files. The Load Photo dialog is displayed.
§ Load Photo Folder – To add an entire folder. The Load Photo Folder dialog is displayed.
2. Browse to the required folder/file(s) and click Open.
3. If you are adding a folder of photos, PhotoMesh automatically creates a group (collection) and places all photos under the folder in this group. You can see the list of photo collections in the collections list under the Collections tab. If you are adding a folder with sub-folders, a dialog is displayed asking if you want to create a separate collection for each sub-folder. Click Yes to create.
Note: If a folder is added with photos that were taken by different cameras or with different focal lengths and principal points, PhotoMesh will automatically place the photos in different collections as long as the required metadata (e.g., Exif) is encoded in the photo files.
4. After loading the photos, the photo collections’ basic properties are displayed in the Add Photos Wizard. Edit the properties as required:
Photo Wizard Properties
|
Collection Name |
Name of the collection in the Photos list. |
|
Coordinate System |
Coordinate system of the collection. Click Select |
|
Focal Length Normalization |
Select which camera properties should be used to set the focal length, and then set the values of the selected properties: § Focal length and sensor width § Focal length and pixel size § Focal length 35 |
5. If you loaded more than one photo collection, an Apply to all ![]() button is displayed next to the Coordinate System and Focal Length Normalization fields in each collection. Click Apply to all
button is displayed next to the Coordinate System and Focal Length Normalization fields in each collection. Click Apply to all ![]() to apply the property value set for that collection to all the collections that were loaded.
to apply the property value set for that collection to all the collections that were loaded.
6. Click Edit in PM to open the Collections list and property sheet so that you can edit additional properties before beginning a build. See "Modifying Photo and Photo Collection Properties" in this chapter for information on additional photo and collection properties.
7. Click Build to open the Build Settings dialog. See "Setting Build Steps, Parameters and Outputs" in the "Building" chapter for information.
Defining Collection Properties with collectionProperties.xml
You can define collection properties and override those included in the metadata (e.g., Exif) encoded in photo files by creating a file named collectionProperties.xml with the required collection properties. This saves you the trouble of creating a full Excel or XML file that contains a list of all the photos. The collectionProperties.xml file is commonly used to add band information, focal length, or other collection level properties. Each collectionProperties.xml file can only contain data for a single collection, so a separate file must be created for each collection for which you want to provide supplementary information and placed in the corresponding collection folder.
There are several mandatory properties in the collectionProperties.xml file. If you want to use the values in the metadata encoded in the photo files, for these properties, set the required property in the collectionProperties.xml file equal to 0, e.g., "Width = 0".
A sample collectionProperties.xml follows below. Property descriptions are in the comments <! ….>.
<?xml version="1.0" encoding="UTF-8"?>
<BlocksExchange version="2.2">
<!—Coordinate system definition à
<SpatialReferenceSystems>
<SRS>
<Id>0</Id>
<Name>WGS 84</Name>
<Definition>GEOGCS["WGS 84",
DATUM["WGS_1984",
SPHEROID["WGS 84",6378137,298.257223563,
AUTHORITY["EPSG","7030"]],
AUTHORITY["EPSG","6326"]],
PRIMEM["Greenwich",0,
AUTHORITY["EPSG","8901"]],
UNIT["degree",0.0174532925199433,
AUTHORITY["EPSG","9122"]],
AUTHORITY["EPSG","4326"]]</Definition>
</SRS>
</SpatialReferenceSystems>
<!–Block definition à
<Block>
<Photogroups>–-- A photogroup is a homogeneous group of photographs, all taken by the same physical camera with identical focal length and principal point.-->
<Photogroup>–-- Name of the photogroup -->
<Name>NIR</Name>
–-- (Mandatory) Width and height of the photos, in pixels. If you do not want the collectionProperties.xml to override the width or height information in the metadata encoded in the photo files, set their values equal to 0. -->
<ImageDimensions>
<Width>0</Width>
<Height>0</Height>
</ImageDimensions>
<Accuracy>
–-- (Optional) Weight to assign to the photos' provided accuracy values. See "Collection Property Sheet" in the "Photo Management" chapter for information.-->
–-- (Optional) Weight to assign to the photos’ provided XY coordinates in determining the calculated XY values. This ranges from 0-100, where 0 is Unreliable and 100 is Very High - External AT.-->
<HorizontalAccuracyFactor>30</HorizontalAccuracyFactor>
–-- (Optional) Weight to assign to the photos’ provided altitude in determining the calculated altitude value. This ranges from 0-100, where 0 is Unreliable and 100 is Very High - External AT.-->
<VerticalAccuracyFactor>40</VerticalAccuracyFactor>
–-- (Optional) A percentage that indicates the allowable deviation from the provided focal length value when calculating the AT. This represents the accuracy of the provided focal length. This ranges from 0-100, where 0 is Use Input Value and 100 is Unreliable.-->
<FocalLengthAccuracy>25</FocalLengthAccuracy>
–-- (Optional) A percentage that indicates the allowable deviation from the provided principal point when calculating the AT. This represents the accuracy of the provided principal point. This ranges from 0-100, where 0 is Use Input Value and 100 is Unreliable.-->
<PrincipalPointAccuracy>15</PrincipalPointAccuracy>
–-- (Optional) Radial accuracy. It is generally recommended to enter a value of 1 for the "Standard" option. If your data was captured with a professional camera that automatically applied a radial distortion correction (i.e., the original distortion value is extremely accurate), enter 0 for "Use input value". -->
<RadialAccuracy>1</RadialAccuracy>
–-- (Optional) Tangential accuracy. It is generally recommended to enter a value of 1 for the "Standard" option. If your data was captured with a professional camera that automatically applied a radial distortion correction (i.e., the original distortion value is extremely accurate), enter 0 for "Use input value". -->
<TangentialAccuracy>1</TangentialAccuracy>
–-- (Optional) Enter a value of 1 to ignore the provided orientation value. -->
<IgnoreOrientation>1</IgnoreOrientation>
</Accuracy>
–-- Optional Parameters. Don’t include if you don't want the collectionProperties.xml to override the information in the metadata encoded in the photo files. -->
–-- (Optional) Bands in comma delimited string format, e.g., (Red,Green,Blue,NIR). Possible values are: Grayscale, Red, Green, Blue, NIR, InfraRed, RedEdge, Alpha, Pan, SWIR_1, SWIR_2, TIR_1, TIR_2, Costal, Custom_0, Custom_1, Custom_2, Custom_3, Custom_4, Custom_5, Custom_6, Custom_7, Custom_8, Custom_9, Exclude (This band will be ignored.) -->
<Bands>Red,Green,Custom_1</Bands>
–-- (Optional) Focal length in millimeters. -->
<FocalLength>80.0</FocalLength>
–-- (Optional) Size of a physical pixel on the camera sensor in millimeters. -->
<PixelSize>0.0052</PixelSize>
<!— (Mandatory) Origin and units of the principal point. The possible values are: topleftpixels topleftmm centerpixels centermm. Use "centermm" if you don't have this information. -->
<PrincipalPointReferenceMethod>centerpixels</PrincipalPointReferenceMethod>
<!— (Optional) PrincipalPoint x and y values, in the units set by PrincipalPointReferenceMethod. -->
<PrincipalPoint>
<x>7360</x>
<y>4912</y>
</PrincipalPoint>
<!—Use yaw, pitch, roll values for orientation -->
</UseYPR>
–-- (Optional) Offset along the Phi axis in degrees.-->
<PhiOffset>90</PhiOffset>
–-- (Optional) Offset along the Kappa axis in degrees.-->
<KappaOffset>-180</KappaOffset>
–-- (Optional) Offset along the Omega axis in degrees. -->
<OmegaOffset>0.0</OmegaOffset>
–-- (Optional) Offset from the current altitude value in the coordinate system units. If Lat-Long, use meters. -->
<AltitudeOffset>-10.0</AltitudeOffset>
–-- (Optional) Flips the Phi axis.-->
<FlipPhi>false</FlipPhi>
–-- (Optional) Flips the Kappa axis.-->
<FlipKappa>false</FlipKappa>
–-- (Optional) Flips the Omega axis.-->
<FlipOmega>false</FlipOmega>
–-- (Optional) Boolean that determines whether to include this collection in the point cloud.-->
<UseInDpc>false</UseInDpc>
–-- (Optional) Boolean that determines whether to include this collection in the textured model.-->
<UseInModelTexture>true</UseInModelTexture>
–-- (Optional) Boolean that determines whether to include this collection in the orthophoto. -->
<UseInOrthoTexture>true</UseInOrthoTexture>
–-- (Optional) Radial and tangential distortion coefficients calculated using the Brown-Conrady model. See here for more information. -->
<Distortion>
–-- (Optional) Defines the 1st radial distortion coefficient. -->
<K1>0.0</K1>
–-- (Optional) Defines the 2nd radial distortion coefficient. -->
<K2>0.0</K2>
–-- (Optional) Defines the 3rd radial distortion coefficient. -->
<K3>0.0</K3>
–-- (Optional) Defines the 1st tangential distortion coefficient. -->
<P1>0.0</P1>
–-- (Optional) Defines the 2nd tangential distortion coefficient. -->
<P2>0.0</P2>
</Distortion>
</Photogroup>
</Photogroups>
</Block>
</BlocksExchange>
To define collection properties using a collectionProperties.xml file:
1. Place the collectionProperties.xml file in the corresponding collection folder.
2. Load the collection folder. See "Loading Photo Files from Disk" in this chapter for information.
Loading a Photo List File
Instead of manually entering all photo and photo collection information (e.g., sensor width, focal length, and aerotriangulation data), you can load an Excel or ContextCapture XML file that references the photos and includes this data. You also have the option to load a local CSV file that includes only XYZ and OPK/YPR data. Excel and ContextCapture XML photo list files can reference photos stored locally or on an HTTP or HTTPS server, or Amazon S3. The path in the photo list file can be relative or absolute, e.g., s3://skyline-data/Frederick_xlsx/CF012316.tif ORhttp://www.skylineglobe.com/Photos_LiDARs/Photos/tux-1771.jpg
Note: In the photo list file, the photos' path should point directly to the photos' path on the server or S3. The photo list file itself must be located on and loaded from a local or shared drive.
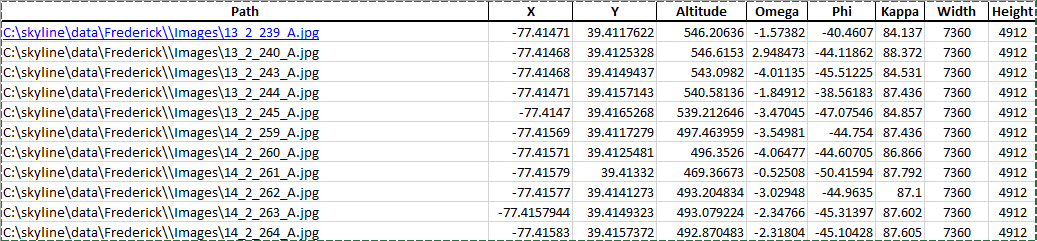
A sample Excel (PhotoMeshSample.xlsx) file is included in the application's folder, which can serve as a template for creating such a file as well as provide basic property definitions (in the Excel’s notes). You can also see "Collection Property Sheet" and "Photo List" in this chapter for a description of the Excel/XML/CSV parameters.
The Excel file should include the following sheets:
§ The first sheet named Collections should detail the group properties for each of the "collections", i.e., groups of photos. For optimal performance, each collection should include only photographs taken by the same physical camera with identical focal length and principal point. These group properties are the same as the properties that are listed in the Collection property sheet. See "Collection Property Sheet" in this chapter. Each row after the heading row (with all the property names) represents a different collection.
§ A separate sheet for each of the collections, listing the properties of each photo in the collection. The name of each collection sheet must be identical to the collection name defined in the Name field of the Excel’s Collections sheet. The photo properties are the same as the properties in the photo list. See "Photo List" in this chapter.

Excel File – Collection Property Sheet
Excel File – Photo Property Sheet for Specific Collection
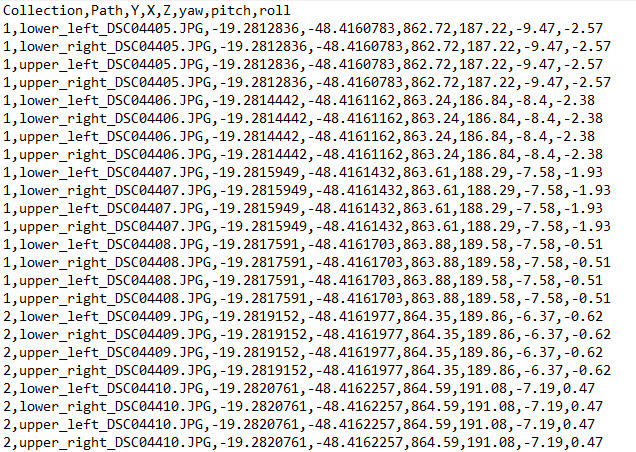
CSV File – Photo Properties for Multiple Collections
To add photo files using an Excel or XML file:
1. On the Home tab, in the Add group, click Photos, and then from the Add Photos Wizard, select Load Photos from List. The Load a Photo List File dialog is displayed.
2. Browse to the Excel or XML file. The photo files are loaded into the project. After loading the photos, the photo collections' basic properties are displayed in the Add Photos Wizard. Edit the properties as required. See "Photo Wizard Properties" for information on the wizard properties and "Modifying Photo and Photo Collection Properties" in this chapter for information on additional photo and collection properties.
To add photo files using a CSV file:
1. On the Home tab, in the Add group, click Photos, and then from the Add Photos Wizard, select Load Photos from List. The Load a Photo List File dialog is displayed.
2. Browse to the CSV file. The CSV/TXT Importer dialog is displayed.
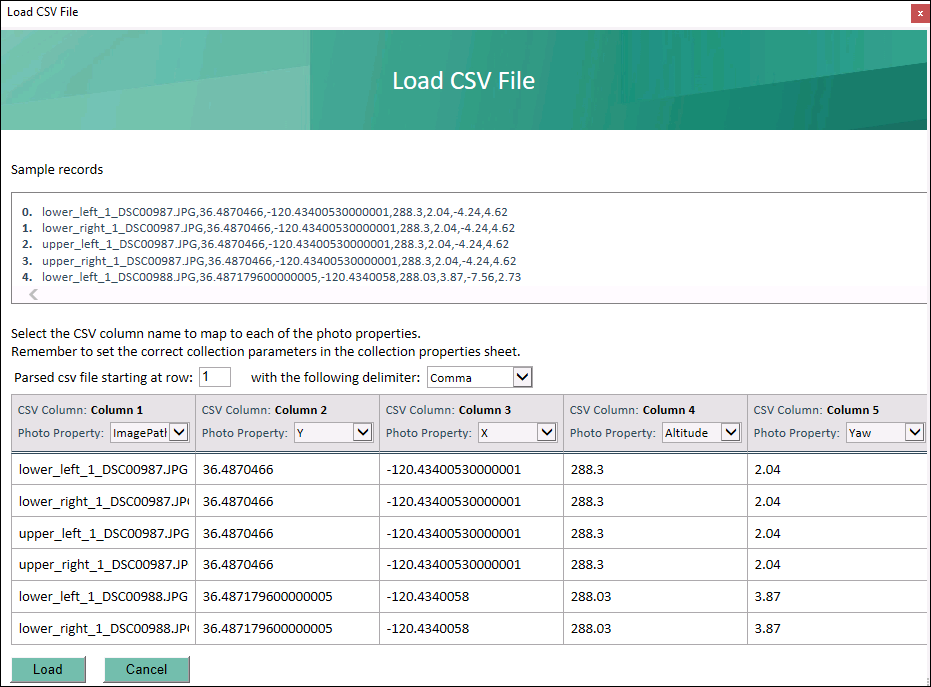
CSV/TXT Importer
3. Enter the row at which to start import, and select a Delimiter.
4. Select the CSV column that corresponds to each of the photo properties. PhotoMesh remembers the column mapping from your most recent CSV import, so only modifications from the last import need to be adjusted.
5. Click Load.
6. After loading the photos, the photo collections' basic properties are displayed in the Add Photos Wizard. Edit the properties as required. See "Photo Wizard Properties" for information on the wizard properties and "Modifying Photo and Photo Collection Properties" in this chapter for information on additional photo and collection properties.
Loading Photos from a Video
PhotoMesh can extract individual frames from video and save them as photo files. Supported video formats include: MPEG, AVI, MOV, and WMV.
To load photos from a video:
1. On the Home tab, in the Add group, click Photos, and then from the Add Photos Wizard, select Load Video. The Load Video dialog is displayed.
2. Browse to the video file, and click Open. The Load Video Editor is displayed.

Load Video Editor
3. Enter the following information:
|
Start |
Start time from which video frame extraction should begin. Type in the time or drag the Start marker of the Video Cropping bar to the required position. |
|
End |
End time for video frame extraction. Type in the time or drag the End marker of the Video Cropping bar to the required position. |
|
Frame Every |
Sampling interval, i.e., every how many seconds a frame should be captured. |
|
Focal Length Normalization |
Camera properties used to set the focal length. Select one of the following options: § Focal length and sensor width § Focal length and pixel size § Focal length 35 |
|
Focal Length |
Focal length in millimeters. |
|
Sensor Width |
Size of the camera sensor in millimeters. |
|
Pixel Size |
Size of a physical pixel on the camera sensor in millimeters. |
|
Zoom |
How the video was captured: § Fixed - Select if the video was captured with a fixed zoom. In this case, PhotoMesh will ensure that all intrinsic parameters for all the video frames are the same. § Not Fixed - Select if the zoom level varied over the course of the capture, e.g., by using auto-zoom. In this case, PhotoMesh will calculate intrinsic parameters per frame. |
4. Click Load. The video frames are loaded into the project as photo files into a single photo collection.
Loading a PhotoMesh Project
When a PhotoMesh project (.PhotoMeshXML) is loaded into a second project, only the project’s photos and photo and collection parameters are loaded. Other project information (e.g. terrain objects, control points, and other project parameters) is not loaded.
To load a PhotoMesh project:
1. On the Home tab, in the Add group, click Photos, and then from the Add Photos Wizard, select Load Photo List File. The Load a Photo List File dialog is displayed.
2. Browse to the required PhotoMesh project file. The project’s photos and photo and collection parameters are loaded into the project.
Importing Photos with Metadata
Import photos with calculated aerotriangulation data and internal camera parameters from INPHO, BINGO, or Stellacore files. When importing Inpho or Bingo results in a Cartesian coordinate system, such as ENU or ECEF, the AT step of the build process can be skipped (by selecting "Do not calculate AT (Fully trusted)," in the Calculation Mode AT setting). Imported AT data in a projected coordinate system such as UTM, however, may be unreliable either due to earth curvature or earth curvature corrections performed in the other system. This is particularly true for datasets that contain oblique photos or large frames, or cover a large geographic area. For data of this type, aerotriangulation should be re-performed in PhotoMesh, i.e., use Refine AT instead of Do not calculate AT(Fully trusted) for the Calculation Mode AT setting.
In PhotoMesh 8.0, radial/tangential distortion values are not imported with INPHO data, so it is recommended to select the "Refine AT" Calculation Mode AT setting to rerun the aerotriangulation process (performing only bundle adjustment and GCP).
Importing Inpho Data
When importing Inpho results, the AT step of the build process can sometimes be skipped. See "Importing Photos with Metadata" in this chapter for more information.
To import Inpho Data:
1. On the Home tab, in the Add group, click Photos, and then from the Add Photos Wizard, select Import Photos with Metadata. The Import Tool dialog is displayed.
Note: The fields displayed vary depending on the type of data selected.
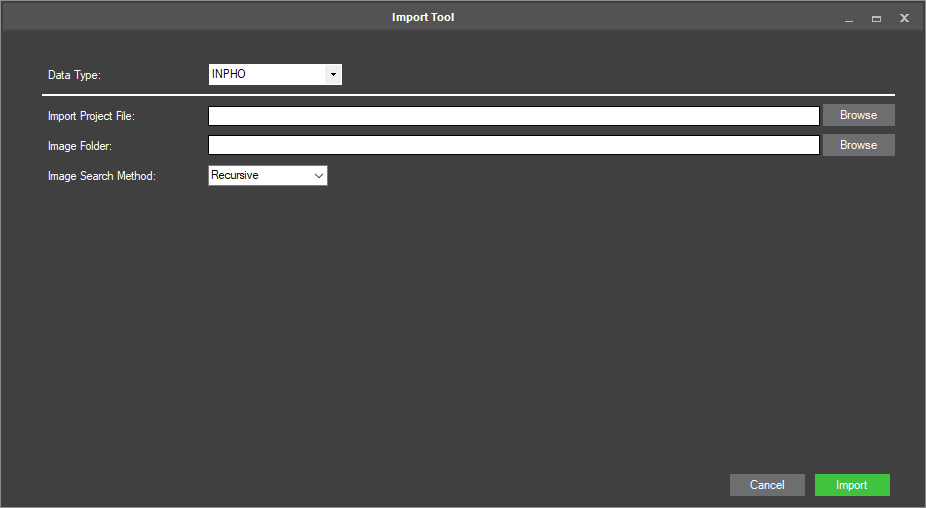
Import Tool
2. Enter the following information:
|
Field |
Description |
|
Data Type |
Select the data type. |
|
Import Project File |
Click Browse. Then in the Import Project File dialog, browse to the required file, and click Open. |
|
Image Folder |
Click Browse. Then in the Import Image Folder dialog, browse to the required folder, and click Select Folder. |
|
Image Search Method |
Select one of the following options: § Recursive – To include image files in all subdirectories § Top Directory Only – To include image files only from the top level directory |
3. Click Import.
Importing Bingo Data
When importing Bingo results, the AT step of the build process can sometimes be skipped. See "Importing Photos with Metadata" in this chapter for more information.
To import Bingo Data:
1. On the Home tab, in the Add group, click Photos, and then from the Add Photos Wizard, select Import Photos with Metadata. The Import Tool dialog is displayed.
Note: The fields displayed vary depending on the type of data selected.
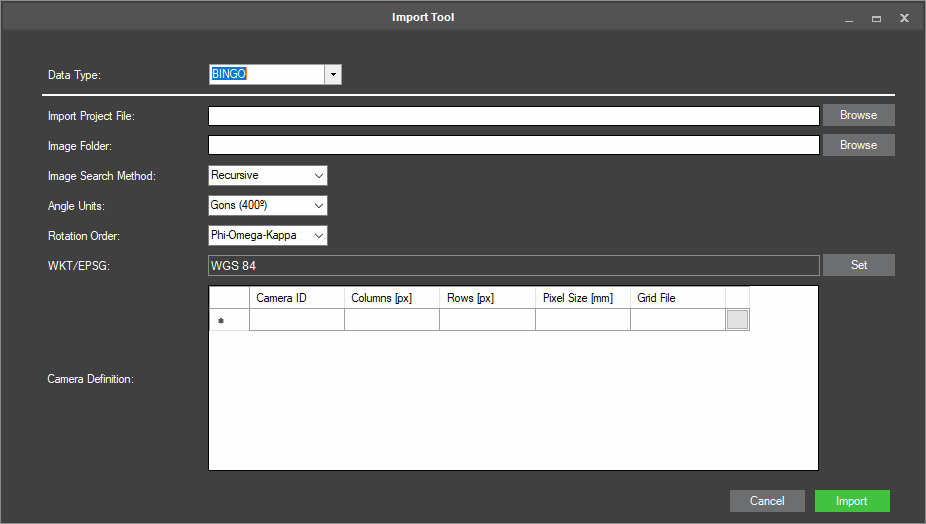
Import Tool
2. Enter the following information:
|
Field |
Description |
|
Data Type |
Select the data type. |
|
Import Project File |
Click Browse. Then in the Import Project File dialog, browse to the required file, and click Open. |
|
Image Folder |
Click Browse. Then in the Import Image Folder dialog, browse to the required folder, and click Select Folder. |
|
Image Search Method |
Select one of the following options: § Recursive – To include image files in all subdirectories § Top Directory Only – To include image files only from the top level directory |
|
Angle Units |
Select the data’s angle units (Gons or Degrees). |
|
Rotation Order |
Select the rotation order (Phi-Omega-Kappa or Omega-Phi-Kappa). |
|
WKT/ESPG |
Click Set to set the data’s coordinate system. See "Coordinate System" in the "Basic Concepts" chapter for more information. |
|
Camera Definition |
For each camera in the BINGO project file, enter the following information: § Camera ID – Camera name as it appears in the BINGO project file. This field is automatically filled in after the Import Project File is selected. § Columns – Number of pixel columns in a photo taken with this camera (image width). § Rows – Number of pixel rows in a photo taken with this camera (image height). § PixelSize – Camera sensor’s pixel size. § GridFile (Optional): File with camera distortion information that may be supplied by your data provider together with the BINGO file. This information can be applied during import to reduce image distortion. Click the button to open the Select Grid Calibration File dialog. Then browse for the grid file. |
3. Click Import.
Importing Stellacore Data
To import Stellacore Data:
1. On the Home tab, in the Add group, click Photos, and then from the Add Photos Wizard, select Import Photos with Metadata. The Import Tool dialog is displayed.
Note: The fields displayed vary depending on the type of data selected.
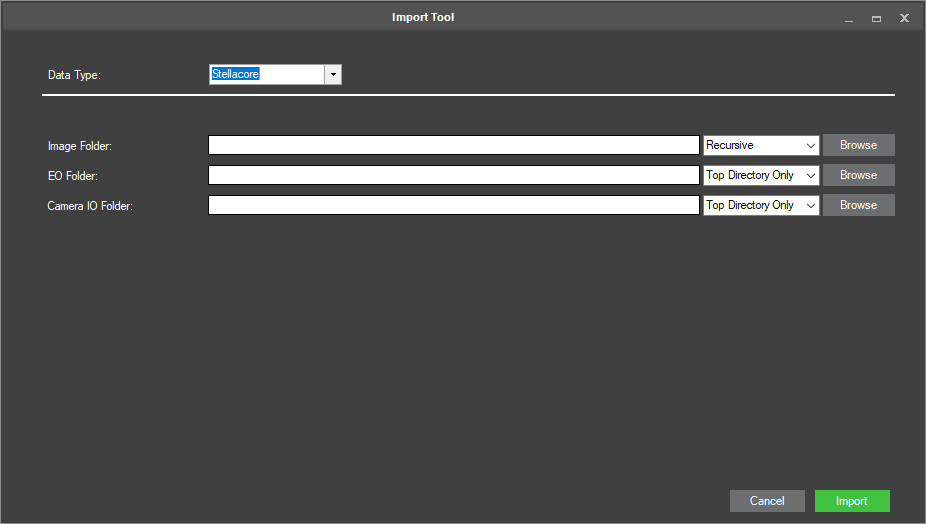
Import Tool
2. Enter the following information:
|
Field |
Description |
|
Data Type |
Select the data type. |
|
Image Folder |
A folder containing the images. Click Browse. Then in the Select Image Folder dialog, browse to the required folder, and click Select Folder. Select one of the following search options: § Recursive – To include image files in all subdirectories § Top Directory Only – To include image files only from the top level directory |
|
EO Folder |
A folder containing the external orientation information. Click Browse. Then in the Import EO Base Folder dialog, browse to the required folder, and click Select Folder. Select one of the following search options: § Recursive – To include files in all subdirectories § Top Directory Only – To include files only from the top level directory |
|
Camera IO Folder |
A folder containing the camera’s internal orientation information. Click Browse. Then in the Import Camera IO Base Folder dialog, browse to the required folder, and click Select Folder. Select one of the following search options: § Recursive – To include files in all subdirectories § Top Directory Only – To include files only from the top level directory |
3. Click Import.