Using the Data Slice Control
After creating a point cloud model, you can designate which section(s) of it to include using the Data Slice Control. This control enables you to define either exclusion or inclusion bounding boxes.
§ Inclusion box – Only points inside the box are displayed.
§ Exclusion box - Only points outside the box are displayed.
When the point cloud model is selected for editing, a yellow frame and a red frame surround it. The yellow frame represents the total area of the point cloud model. The red frame represents the area that will be displayed. When you use the sliders on the Data Slice Control, the red frame is updated to show the selected area.
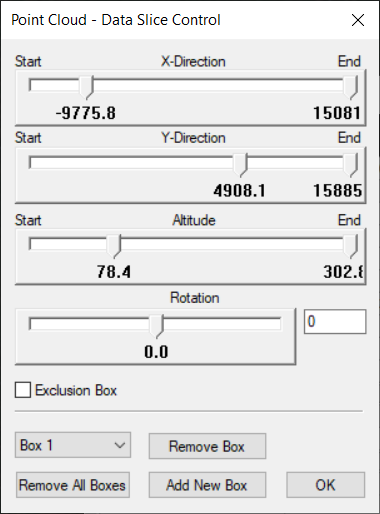
Point Cloud - Data Slice Control Settings
To define a bounding exclusion or inclusion box:
1. In the point cloud property sheet, in the Data Slice field, click Set. The Point Cloud – Data Slice Control is displayed.
2. For the X-Direction, Y-Direction, and Altitude controls, adjust the Start and End sliders to designate the limits of the bounding box. The values displayed are the distance in meters from the center point of the point cloud model.
3. Enter the rotation of the bounding box on the horizontal plane by adjusting the Rotation slider or typing the rotation value in the text box. The rotation value is converted to an equivalent value between -180º and 180º.
4. If you want the bounding box to function as an exclusion box, select the Exclusion Box check box.
5. If you want to create multiple bounding boxes, select Add New Box, and repeat steps 2-4.
Note: You can use multiple Exclusion boxes but only one Inclusion box.
6. If you want to remove a box, select the required box in the Box dropdown list ![]() , and select Remove Box.
, and select Remove Box.
7. If you want to remove all boxes, select Remove All Boxes.
8. Click OK.