Using the Create Message Dialog
To create a message:
1. Open the Create Message dialog. See “Adding Messages” in this chapter for information.

Create Message Dialog
2. Enter values for the following parameters:
|
Parameter |
Description |
|
Type |
Determines the type of message to be displayed. Select Text, HTML/Image, File, Script or Links from the dropdown list. |
|
Path |
Enter the path for a local HTML/Image file, remote URL address or any other file to be displayed. If you have selected the Text, Script or Links type, this field is unavailable. |
|
Select the checkbox to open the message in Edge, rather than TerraExplorer. This option is available only when HTML/Image is selected as the Type. Note: Microsoft Edge is best suited for running simple, very limited scripts. Complex scripts that involve back-and-forth interactions with TerraExplorer using events may not function as intended or may experience performance issues. We are working to remove this limitation in future versions of TerraExplorer. |
|
|
Client |
Determines the panel in which the message is displayed. Select Left Dock, Main View, Message Bar, Floating Browser or Floating Pop-up from the dropdown list. If you select Floating Browser, the message is displayed in your default Internet browser. You cannot select floating Browser for Text messages. |
|
Bring to Front |
Select this check box so that the tab that contains this message is the active tab (if there is more than one tab). This option is available only when Left Dock or Main View was selected in the Client field. |
|
Caption |
This option is only available if Floating Popup is selected in the Client field. Type the caption text in the Caption field. |
|
Left/Top |
This option is only available if Floating Popup is selected in the Client field. Set the floating pop-up message initial display position. In the X and Y boxes, type the horizontal and vertical coordinates of the message box upper left corner respectively, relative to the top-left corner of the 3D Window. |
|
Use default position |
This option is only available if Floating Popup is selected in the Client field and the callout Select the Use default Position check box to return to the default message box position. |
|
Width/Height |
This option is only available if Floating Popup is selected in the Client field. Set the floating pop-up message initial size. Type the floating message box width and height in pixels. |
|
Auto size |
Select this check box to automatically set the message box size according to the size of the HTML page. Note: This option is not applicable for text messages (that do not contain HTML content). For optimal performance, it is recommended to use this setting when the web browser is set to Edge rather than TerraExplorer. See “Use Edge” setting above for more information. |
|
Reset to Default Size |
This option is only available if Floating Popup is selected in the Client field. Select the Reset to Default Size check box to set the height and width of the message box to its default size. |
|
Close after |
This option is only available if Floating Popup is selected in the Client field. Select the Close after check box to set the message display duration, and type the timeout duration in the Seconds box. |
|
|
This option is only available if Floating Popup is selected in the Client field. Select the geo-referencing check box to add a pointer from the message box to the object. |
|
Text |
Enter a multi-lined text string to be displayed in the selected client. This field is only available if you selected Text in the Type field. |
|
Script |
This option is only available if Script is selected in the Type field. Enter a JavaScript code to be executed using the TerraExplorer API. Unless you selected Script, this field is unavailable. See “Script Messages” in this chapter for further information. |
|
Preview |
Click Preview to see the selected HTML page or file in the default Windows application. |
|
Reset |
Click Reset to delete the message. |
3. Click OK.
Script Messages
With Script messages, you can enter JavaScript code that uses the TerraExplorer API, into the Script area in the Create Message dialog. This script will be executed when the message is activated. For a complete description of the API, see the TerraExplorer Programmers Guide.
Note: Legacy VBScript has been deprecated and will not work in TerraExplorer Fusion.
You can use the following constants that do not need to be declared:
|
Constant |
Description |
|
ThisXXX |
The “thisXXX” constant represents the ITerraExplorerObjectXXX derived object that the message is assigned to. For example, for a Text Label, you can enter the following script: <script type = "javascript"> alert("Text is: " + This80.Text); </script> When the message is activated, a message box appears with the text content of the text label. |
|
SGWorld80 |
Exposes the SGWorld interface. You can use all ISGWorld properties and methods. For example, this script: <script type = "javascript"> SGWorld80.Open ("c:\\project.fly" ); </script> loads the specified fly file when the message is activated. |
Note: Older interfaces, e.g., This74 & SGWorld74 are also supported, but using the latest versions is recommended.
Messages Displaying Links to Multiple Files
A Links message displays links to multiple documents or files. You can organize the hyperlinks into categories like pictures, videos and text.
You can activate a hyperlink to launch the appropriate file viewer based on file association. For example, a *.doc hyperlink launches the Microsoft Word application (if installed) and displays the document’s content. For security reasons, the file is opened in an HTML browser. If the browser supports this file type (i.e., BMP file), it appears in the selected panel. If the browser does not support this file type or there are security restrictions, the browser displays the appropriate error or warning message.

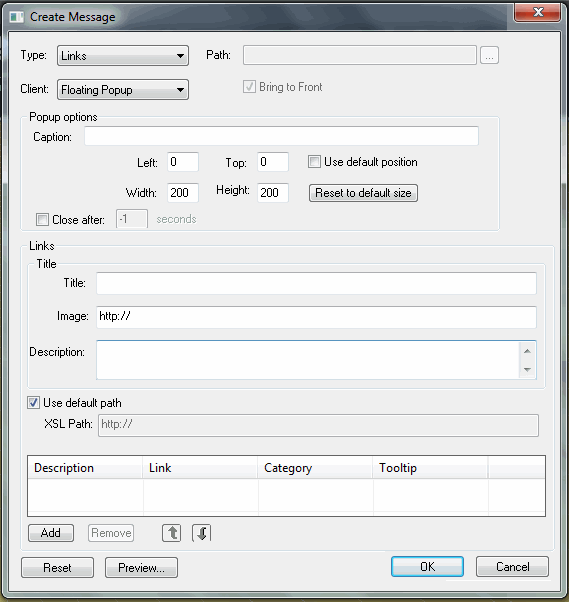
Create Message Dialog for Links Type
Use the following options to set the links parameters:
|
Option |
Description |
|
Title |
Enter the title text. The text appears as the heading of the message. |
|
Image |
A full path name or URL address of an image file that is displayed in the message. |
|
Description |
Enter the text you want to appear in the message. |
|
Use default path |
Select the Use default path check box to style the links message using a default TerraExplorer XSL (Extensible Stylesheet Language) For more information see XSL Path below. |
|
XSL Path |
Enter the path for an XSL file to use to style the Links XML content. See “Styling Links and Attributes Messages with XSL” in this chapter for further information |
|
Links table |
§ Description: a hyperlink text to the referenced document. The text is displayed under the Description column in the message. § Link: A full path name or URL address of the document. § Category: the category of the document that is displayed under the Description column. You can display links from all categories, or from a specific category. § Tool tip: Tooltip text to appear when the mouse cursor is placed over the link. |
|
Add |
Click the Add button to add a link in the Links table. |
|
Remove |
Select a row from the Links table and click Remove to delete a link. |
|
|
Select a row from the Links table and use the Move Up/Down arrows to move it up or down. |
Attributes Messages
You can create an Attributes message to display selected attribute field values of an object. This feature is enabled only for feature layers that have attribute fields information.
See “Using Attribute Fields” in the "Feature Layers" chapter for further information.

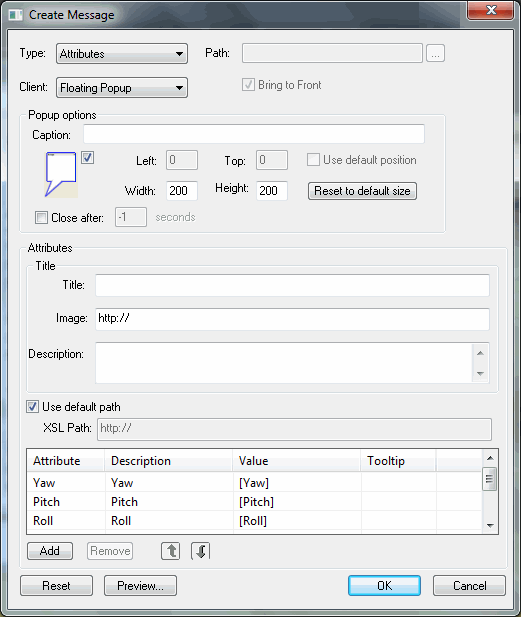
Create Message Dialog - Attributes
The Attributes message consists of the following parameters:
|
Item |
Description |
|
Title |
Enter the title text. The text appears as the heading of the message. |
|
Image |
A full path name or URL address of an image file that is displayed in the message. |
|
Description |
Enter the text you want to appear in the message. |
|
Use default path |
Select the Use default path check box to style the links message using a default TerraExplorer XSL (Extensible Stylesheet Language) For more information see XSL Path below. |
|
XSL Path |
Enter the path for an XSL file to use to style the Links' XML content. See “Styling Links and Attributes Messages with XSL” in this chapter for further information. |
|
Attribute |
Select the field attribute to display from the dropdown list. The name of the attribute field is automatically filled in the Description column. The value column is filled with the attribute name in brackets. |
|
Description |
The textual description of the attribute. |
|
Value |
Use one of the following expression formats: § Attribute Value: Attribute name in brackets, e.g., [ATTRIB], displays the values of the attribute field for the object. § Textual expression: Attrib name in brackets with other text, e.g., Text Before [ATTRIB] Text After. § JavaScript expression: Bounded by <>, e.g., <JS:LCase(“[ATTRIB]”) & “Text”>. |
|
Tooltip |
Type a tooltip text to appear when the mouse cursor is placed over the attribute in the Message. |
Styling Links and Attributes Messages with XSL
Links and Attribute messages store content in an XML document. The content is then styled using an XSL (Extensible Stylesheet Language) file for display in the message. You can use the default XSL provided by TerraExplorer by selecting the Use default path check box or set a path to your XSL in the XSL Path field.
The examples below show dialog entries, and their respective resulting XML files and messages displayed with the TerraExplorer default XSL. The default XSL code is also provided for reference.
Links Messages
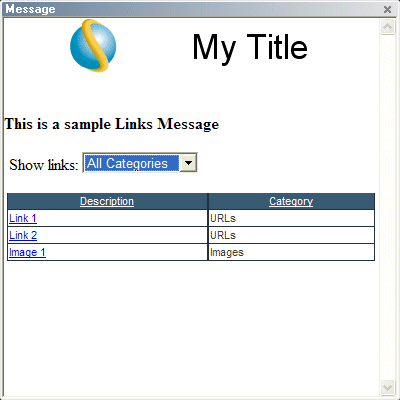
The following is an example showing how the content entered in the Create Message dialog for Links, is put into an XML. The XML is then formatted with the default TerraExplorer XSL and displayed in a message.
The following XML is automatically produced:
<DOCUMENT_LIST name="Links">
<DOCTITLE>
<TITLE>"My Title"</TITLE>
<DESCRIPTION>"This is a sample Links Message"</DESCRIPTION>
<IMAGE>"http://www.skylinesoft.com/logo.gif"</IMAGE>
</DOCTITLE>
<LIST_BODY>
<COLUMNS>
<COLUMN class="urlLinkDescription" urlColumnIdLink="2">
<ID>0</ID>
<NAME>Description</NAME>
<WIDTH>150</WIDTH>
<DEFAULT_VALUE>Link</DEFAULT_VALUE>
<HIDE>0</HIDE>
</COLUMN>
<COLUMN class="urlLink">
<ID>1</ID>
<NAME>Link</NAME>
<WIDTH>150</WIDTH>
<DEFAULT_VALUE>http://</DEFAULT_VALUE>
<HIDE>1</HIDE>
</COLUMN>
<COLUMN>
<ID>3</ID>
<NAME>Category</NAME>
<WIDTH>150</WIDTH>
<HIDE>0</HIDE>
</COLUMN>
<COLUMN class="ToolTip">
<ID>2</ID>
<NAME>Tooltip</NAME>
<WIDTH>150</WIDTH>
<HIDE>1</HIDE>
</COLUMN>
</COLUMNS>
<ROWS>
<ROW>
<CELL>"Link 1"</CELL>
<CELL>"http://www.link1.com"</CELL>
<CELL>"URLs"</CELL>
<CELL>"Tooltip1"</CELL>
</ROW>
<ROW>
<CELL>"Link 2"</CELL>
<CELL>"http://www.link2.com"</CELL>
<CELL>"URLs"</CELL>
<CELL>"Tooltip2"</CELL>
</ROW>
<ROW>
<CELL>"Image 1"</CELL>
<CELL>"http://www.skylinesoft.com/image.gif"</CELL>
<CELL>"Images"</CELL>
<CELL>"Tooltip Image 1"</CELL>
</ROW>
</ROWS>
</LIST_BODY>
</DOCUMENT_LIST>
The message is displayed as follows:

Multiple Files XSL Styled Message
The following is the default TerraExplorer XSL used when the Use Default Path check box is selected for a hyper-link multiple files message:
<?xml version='1.0'?>
<xsl:stylesheet xmlns:xsl="http://www.w3.org/1999/XSL/Transform" version="1.0">
<xsl:template match="/">
<html>
<META http-equiv="Content-Type" content="text/html; charset=UTF-16"/>
<script language="jscript">
<![CDATA[
var allLinksTable;
function Sort(column_index)
{
var linksTable = document.all('linksTable');
for (i=1; i < linksTable.rows.length; i++)
{
var row =linksTable.rows(i);
for (j=i+1; j < linksTable.rows.length; j++)
{
var row1 = linksTable.rows(j);
var str1 = row.cells(column_index-1).innerText;
str1 = str1.toLowerCase();
var str2 = row1.cells(column_index-1).innerText;
str2 = str2.toLowerCase();
if( str1> str2)
{
linksTable.moveRow(j,i);
row =linksTable.rows(i)
}
}
}
}
function document_onload()
{
var linksTable = document.all('linksTable');
allLinksTable = linksTable.cloneNode(true);
if(CatCombo.options.length>0)
return;
var Category = document.createElement("OPTION");
Category.text="All Categories";
Category.value=1;
CatCombo.add(Category);
for (i=1; i < linksTable.rows.length; i++)
{
var row =linksTable.rows(i);
var catName = row.cells(1).innerText;
var bFound=false;
var arr = CatCombo.options;
for(j=0;j<arr.length;j++)
{
if(row.cells(1).innerText == arr[j].innerText)
{
bFound = true;
break;
}
}
if(bFound==false)
{
var Category = document.createElement("OPTION");
Category.text=catName;
Category.value=i+1;
CatCombo.add(Category);
}
}
CatCombo.selectedIndex=0;
CatCombo.focus();
}
function CatCombo_onchange()
{
var linksTable;
if(CatCombo.selectedIndex==0)
linksTable = allLinksTable;
else
{
linksTable = allLinksTable.cloneNode(true);
for(j=1;j<linksTable.rows.length;j++)
{
var row = linksTable.rows(j);
if(row.cells(1).innerText!=CatCombo.options[CatCombo.selectedIndex].text )
{
row.removeNode();
j--;
}
}
}
var oldlinksTable = document.all('linksTable');
oldlinksTable.replaceNode(linksTable);
Sort(1);
}
]]>
</script>
<head>
<style>
.s8 {font-family: Arial, Helvetica; font-size: 11px; font-style: normal; font-weight: normal; color: #3B3B3B; text-decoration: none;}
.s8w {font-family: Arial, Helvetica; font-size: 11px; font-style: normal; font-weight: normal; color: #FFFFFF; text-decoration: underline;}
.s12 {font-family: Arial, Helvetica; font-size: 34px; font-style: normal; font-weight: normal; color: #000000; text-decoration: none;}
TD {border:solid 1px #233141; border-top:solid 0px white;}
</style>
</head>
<body bgcolor="#FFFFFF" leftmargin="0" topmargin="0" marginwidth="0" marginheight="0">
<script LANGUAGE="javascript" FOR="window" EVENT="onload">
document_onload()
</script>
<table border="0" cellspacing="0" cellpadding="0" width="100%" class="s8">
<tr >
<xsl:if test= "string-length(//DOCUMENT_LIST/DOCTITLE/IMAGE/text())>7">
<td align="right" style="border:solid 0px white;filter:progid:DXImageTransform.Microsoft.Gradient(endColorstr='#FFFFFF', startColorstr='#3F5875', gradientType='0');">
<img src="{//DOCUMENT_LIST/DOCTITLE/IMAGE/text()}"/>
</td>
</xsl:if>
<td align='center' colspan='0' class="s12" style="border:solid 0px white;filter:progid:DXImageTransform.Microsoft.Gradient(endColorstr='#FFFFFF', startColorstr='#3F5875', gradientType='0');"><xsl:value-of select="//DOCUMENT_LIST/DOCTITLE/TITLE"/></td>
</tr>
</table>
<br /><span style="margin-left:5px"></span><b><xsl:copy-of select="//DOCUMENT_LIST/DOCTITLE/DESCRIPTION"/></b>
<br /><br />
<span style="margin-left:5px"></span> Show links:
<SELECT language="javascript" id="CatCombo" style="LEFT: 12px; WIDTH: 117px; TOP: 16px"
onchange="return CatCombo_onchange()" name="CatCombo">
</SELECT>
<br />
<br />
<table id="linksTable" cellspacing="0" cellpadding="1" align="center" class="s8" width="98%">
<tr class="rowHeader" style="cursor:pointer;background-color:#3F5875">
<xsl:call-template name="ShowColumnHeader">
<xsl:with-param name="showIndex" select="1"/>
<xsl:with-param name="index" select="1"/>
</xsl:call-template>
</tr>
<xsl:for-each select="//COLUMNS/COLUMN">
<xsl:if test = "@class='ToolTip'">
<xsl:apply-templates select="//ROWS/ROW">
<xsl:with-param name="tooltip_pos" select="position()"/>
</xsl:apply-templates>
</xsl:if>
</xsl:for-each>
</table>
</body>
</html>
</xsl:template>
<xsl:template name="ShowColumnHeader">
<xsl:param name="showIndex"/>
<xsl:param name="index"/>
<xsl:if test="//COLUMNS/COLUMN[$index]">
<xsl:choose>
<xsl:when test="//COLUMNS/COLUMN[$index]/HIDE=1">
<xsl:call-template name="ShowColumnHeader">
<xsl:with-param name="showIndex" select="$showIndex"/>
<xsl:with-param name="index" select="$index+1"/>
</xsl:call-template>
</xsl:when>
<xsl:otherwise>
<td align='center' class='s8w' >
<xsl:attribute name="onclick">
<xsl:text>Sort(</xsl:text><xsl:value-of select="$showIndex"/><xsl:text>)</xsl:text>
</xsl:attribute>
<xsl:value-of select="//COLUMNS/COLUMN[$index]/NAME"/>
<xsl:call-template name="ShowColumnHeader">
<xsl:with-param name="showIndex" select="$showIndex+1"/>
<xsl:with-param name="index" select="$index+1"/>
</xsl:call-template>
</td>
</xsl:otherwise>
</xsl:choose>
</xsl:if>
</xsl:template>
<xsl:template match="//ROWS/ROW">
<xsl:param name="tooltip_pos"/>
<tr>
<xsl:for-each select="child::*">
<xsl:variable name="cell_pos" select="position()"/>
<xsl:choose>
<xsl:when test="//COLUMNS/COLUMN[$cell_pos]/@class='urlLinkDescription'">
<xsl:variable name="column_id" select="//COLUMNS/COLUMN[$cell_pos]/@urlColumnIdLink"/>
<td><a href="{../CELL[position()=$column_id]/text()}" title="{../CELL[$tooltip_pos]}" target="_blank"><xsl:value-of select="."/></a></td>
</xsl:when>
<xsl:otherwise>
<xsl:choose>
<xsl:when test="//COLUMNS/COLUMN[$cell_pos]/HIDE=1">
</xsl:when>
<xsl:otherwise>
<td title="{../CELL[$tooltip_pos]}"><xsl:value-of select="text()"/></td>
</xsl:otherwise>
</xsl:choose>
</xsl:otherwise>
</xsl:choose>
</xsl:for-each>
</tr>
</xsl:template>
</xsl:stylesheet>
Attributes Messages
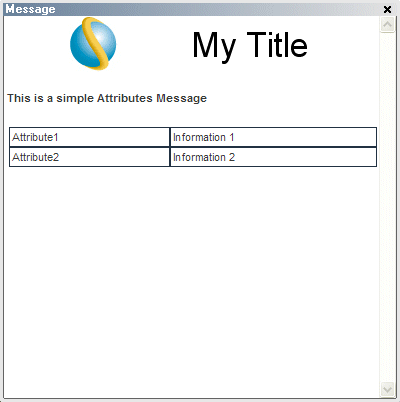
The following is an example showing how the content entered in the Create Message dialog for Attributes, is put into an XML. The XML is then formatted with the default TerraExplorer XSL and displayed in a message.
The following XML is automatically produced:
<DOCUMENT_LIST name="Attributes">
<DOCTITLE>
<TITLE>"My Title"</TITLE>
<DESCRIPTION>"This is a sample Attributes Message"</DESCRIPTION>
<IMAGE>"http://www.skylinesoft.com/logo.gif"</IMAGE>
</DOCTITLE>
<LIST_BODY>
<COLUMNS>
<COLUMN>
<ID>0</ID>
<NAME>Attribute</NAME>
<WIDTH>100</WIDTH>
<HIDE></HIDE>
</COLUMN>
<COLUMN>
<ID>1</ID>
<NAME>Description</NAME>
<WIDTH>150</WIDTH>
</COLUMN>
<COLUMN>
<ID>2</ID>
<NAME>Value</NAME>
<WIDTH>150</WIDTH>
</COLUMN>
<COLUMN class="ToolTip">
<ID>3</ID>
<NAME>Tooltip</NAME>
<WIDTH>150</WIDTH>
</COLUMN>
</COLUMNS>
<ROWS>
<ROW>
<CELL>"Attribute1"</CELL>
<CELL>"Attribute1"</CELL>
<CELL>"[Attribute1]"</CELL><!-- Automatically replaced by attribute value for each object, e.g., "Information1"-->
<CELL>"tooltip for attrib1"</CELL>
</ROW>
<ROW>
<CELL>"Attribute2"</CELL>
<CELL>"Attribute2"</CELL>
<CELL>"[Attribute2]"</CELL><!-- Automatically replaced by attribute value for each object, e.g., "Information2"-->
<CELL>"tooltip for attrib2"</CELL>
</ROW>
</ROWS>
</LIST_BODY>
</DOCUMENT_LIST>
The message is displayed as follows:

Multiple Files XSL Style Message
The following is the default TerraExplorer XSL used when the Use Default Path check box is selected for an attributes message:
<?xml version='1.0' encoding='UTF-8'?>
<xsl:stylesheet xmlns:xsl="http://www.w3.org/1999/XSL/Transform" version="1.0">
<xsl:template match="/">
<html>
<META http-equiv="Content-Type" content="text/html; charset=UTF-16"/>
<head>
<style>
.s8 {font-family: Arial, Helvetica; font-size: 11px; font-style: normal; font-weight: normal; color: #3B3B3B; text-decoration: none;}
.s8w {font-family: Arial, Helvetica; font-size: 11px; font-style: normal; font-weight: normal; color: #FFFFFF; text-decoration: underline;}
.s12 {font-family: Arial, Helvetica; font-size: 34px; font-style: normal; font-weight: normal; color: #000000; text-decoration: none;}
TD {border:solid 1px #233141;}
</style>
</head>
<body bgcolor="#FFFFFF" leftmargin="0" topmargin="0" marginwidth="0" marginheight="0">
<table border="0" cellspacing="0" cellpadding="0" width="100%" class="s8">
<tr>
<xsl:if test= "string-length(//DOCUMENT_LIST/DOCTITLE/IMAGE/text())>7">
<td class="s12" align="right" style="border:solid 0px white;filter:progid:DXImageTransform.Microsoft.Gradient(endColorstr='#FFFFFF', startColorstr='#3F5875', gradientType='0');"><img src="{//DOCUMENT_LIST/DOCTITLE/IMAGE/text()}"/></td>
</xsl:if>
<td align='center' class="s12" colspan='0' style="border:solid 0px white;filter:progid:DXImageTransform.Microsoft.Gradient(endColorstr='#FFFFFF', startColorstr='#3F5875', gradientType='0');"><xsl:value-of select="//DOCUMENT_LIST/DOCTITLE/TITLE"/></td>
<style type="text/css">
</style>
</tr>
</table>
<table class="s8">
<tr>
<td style="border:solid 0px white;">
<span style="margin-left:5px"></span><b><xsl:copy-of select="//DOCUMENT_LIST/DOCTITLE/DESCRIPTION"/>
</b></td>
</tr>
</table>
<br></br>
<table cellspacing="0" cellpadding="2" width="98%" class="s8" style="margin-left:5px">
<xsl:for-each select="//COLUMNS/COLUMN">
<xsl:if test = "@class='ToolTip'">
<xsl:apply-templates select="//ROWS/ROW">
<xsl:with-param name="tooltip_pos" select="position()"/>
</xsl:apply-templates>
</xsl:if>
</xsl:for-each>
</table>
</body>
</html>
</xsl:template>
<xsl:template match="//ROWS/ROW">
<xsl:param name="tooltip_pos"/>
<tr>
<xsl:for-each select="child::*">
<xsl:variable name="cell_pos" select="position()"/>
<xsl:if test="//COLUMNS/COLUMN[$cell_pos]/@class='ToolTip'">
</xsl:if>
<xsl:choose>
<xsl:when test="//COLUMNS/COLUMN[$cell_pos]/@class or //COLUMNS/COLUMN[$cell_pos]/HIDE">
</xsl:when>
<xsl:otherwise>
<td title="{../CELL[$tooltip_pos]}"><xsl:value-of select="text()"/></td>
</xsl:otherwise>
</xsl:choose>
</xsl:for-each>
</tr>
</xsl:template>
</xsl:stylesheet>
Adding a Tooltip
The object’s tool tip is a text string that appears when you place the cursor, in the 3D Window, above the object for more than half a second.
You can add the tool tip through the object’s property sheet window. The tool tip string can include more than one line of text.