Uploading Layers to SkylineGlobe Server
You can upload your layers to SkylineGlobe Server directly from TerraExplorer.
Note: TerraExplorer is the only client that can serve layers, which are missing their EPSG code indicating the projection in the data should be served.
Note: An entire project and all its layers, resources, and styling can also be published to SkylineGlobe Server. See “Publishing a Project to SkylineGlobe Server” in the “Publishing TerraExplorer Projects” chapter for information.
To upload a layer:
1. In the Project Tree, right-click the required layer, and select Upload to SkylineGlobe from the shortcut menu. Use CTRL-click or SHIFT-click to multi-select layers.
2. If you aren’t already logged in to the required SkylineGlobe Server, the Login to SkylineGlobe Server dialog is first displayed to enable you to log in. See “Logging In to a SkylineGlobe Server” in this chapter for information.
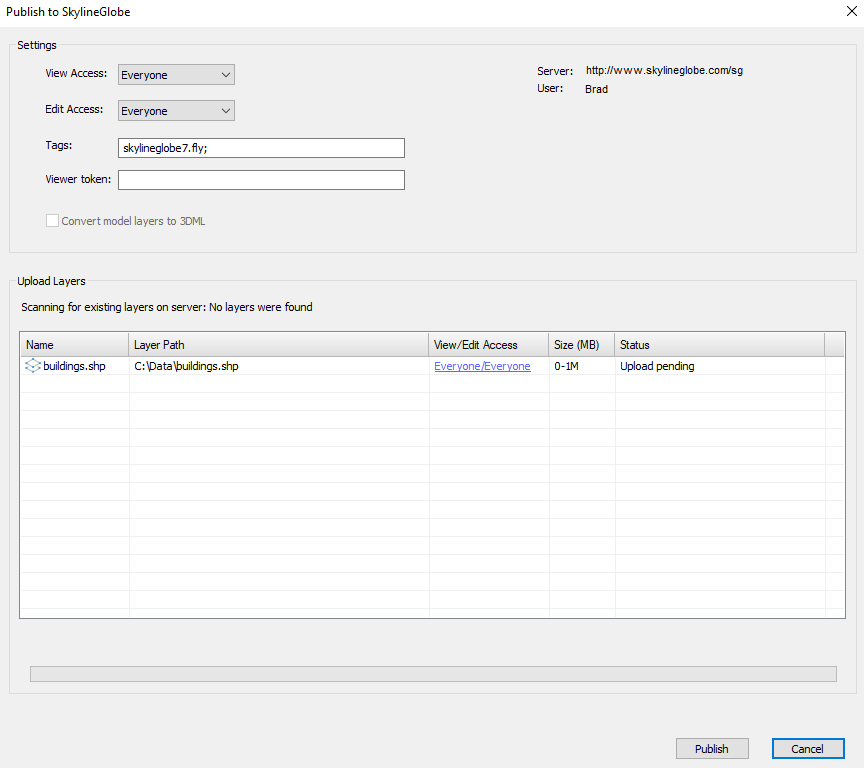
After logging in, the Publish to SkylineGlobe dialog is displayed.

Publish to SkylineGlobe Dialog
3. Set the View Access for the layer:
§ Only me – Only for user publishing the project
§ My group – Everyone in the user’s group
§ My site – Everyone in the user’s server site
§ Everyone – Viewable by everyone
4. Set the Edit Access for the layer:
§ None – No edit access is granted even to the user publishing the layer
§ Only me – Only for user publishing the layer
§ My group – Everyone in the user’s group
§ My site – Everyone in the user’s server site
§ Everyone – Editable by everyone
5. Set Tags for advanced searches. The default value for this field is the layer name. If adding multiple tags, they should be semicolon delimited.
6. If you want to set a viewer token that can be used to grant view access to the layer, enter a Viewer Token.
7. If you are uploading a point shapefile with individually referenced 3D model files and you want to convert it to a unified, stream optimized 3D Mesh Layer (3DML) database, select the Convert model layers to 3DML check box.
Note: A feature layer that references GLB model files cannot be converted to 3DML.
8. Before uploading a layer, TerraExplorer compares its file size, checksum, and metadata to all files currently on the server, to determine if a duplicate of this layer was already published to the server. If a duplicate is found, the existing copy can be used instead of expending resources on re-publishing this layer. TerraExplorer’s default action depends on how close a match is found: When a perfect match is found, the default action is to use the existing layer; when no match or only a similar (but not perfect) match is found, the default action is to upload the new layer. If you want to perform the default action, click Publish.
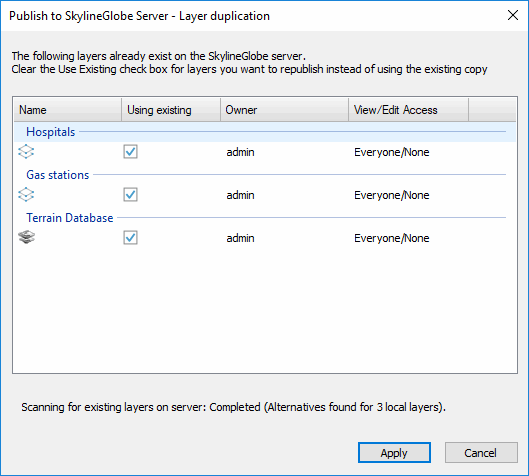
9. If you want to view similar layers on the server for all uploaded layers, click the Show existing layers link. The Publish to SkylineGlobe Server – Layer Duplication dialog is displayed, showing all the layers for which there is already a close or identical copy on the SkylineGlobe Server. If you want to view similar layers on the server for a specific layer for which a similar or perfect match was found, click the link in the layer’s Status field. The Publish to SkylineGlobe Server – Layer Duplication dialog is displayed, showing all duplicates on the server for the specific layer. Do the following:
a. If you want to republish layer(s) for which matches were found instead of using the existing layers on the server, clear the Use Existing checkbox for each of the layers, and click Apply.
b. If you want to use existing layers on the server for layers for which a similar but not exact match was found, select their check boxes, and click Apply.
c. Click Publish.

Publish Layer to SkylineGlobe Server – Layer Duplication Dialog
10. After the publishing process is complete, a dialog is displayed asking if you want to replace the local layer with the layer published to SkylineGlobe server. Click Yes to open the published layer.
Note: In some cases, TerraExplorer may add Data Attribute Style (DAS) attributes to the published feature layers.