HoloLens Tool
The HoloLens plug-in (TEZ) displays the TerraExplorer 3D view as a lifelike 3D hologram that can be viewed in the HoloLens 2 immersive headsets. The hologram is displayed on a virtual table whose dimensions can be customized and whose location is determined simply by the placement of a QR code. From TerraExplorer's GUI, you connect TerraExplorer to your HoloLens headsets and manage various settings.
To install and set up (first time use):
1. Double click the HoloLens.tez TEZ file received from Skyline.
2. Open TerraExplorer, and on the Tools tab, click HoloLens.
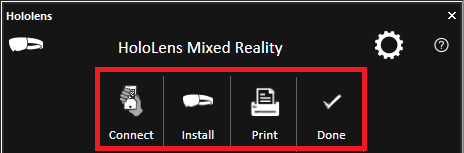
3. The HoloLens Mixed Reality dialog is displayed. If HoloLens was not yet set up, the HoloLens tool opens directly to a series of setup screens. You can navigate between these screens using the tabs at the top of the dialog: Connect, Install, Print, Done.
4. On the Connect tab, enter the IP address of the computer running TerraExplorer that will be used by the HoloLens headset and your handheld controller device. The HoloLens tool automatically scans the network for available IP's and lists them under the Suggested section. Select one of the suggested IPs or type your own.
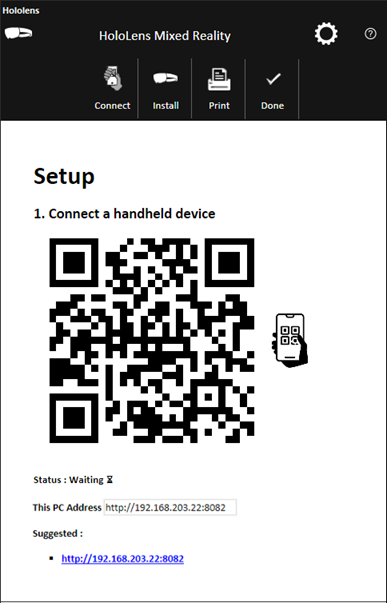
5. Connect a handheld device: The QR code in the dialog updates to the selected IP. Scan the QR code with the handheld device (e.g., phone) you intend to use as a controller for HoloLens, to make sure that your device is connected to the same network. Then click the Install tab at the top of the dialog on your computer.
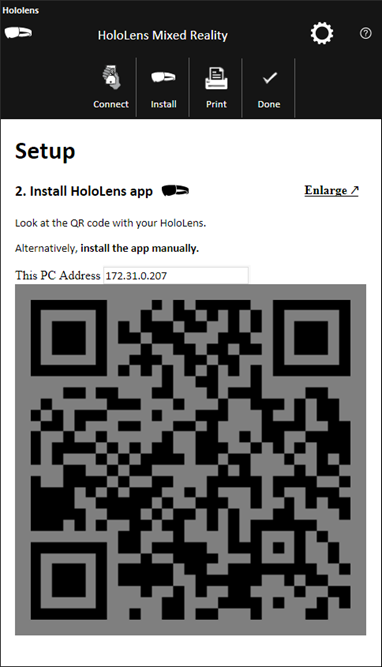
6. Install Skyline Remote Player on each of the HoloLens headsets: Put on the HoloLens headset and look at the QR code on the setup page. Then do the following:
a. On the HTML page that opens, click Download Player to download the Skyline Remote Player. The installation file will display in your browser's Downloads list.
b. When the download is complete, click on the file in the Downloads list. The installation page is displayed on the HoloLens headset.
c. Click Install. Enter the Sign-in pin of the HoloLens account, and again click Install.
7. Run Skyline Remote Player on each of the HoloLens headsets: After installation is complete, put on the headset and use the start gesture to launch the main menu. Then do the following:
a. Select the Settings tile to launch the Skyline Remote Player app in your environment.
b. Select Update.
c. Select For developers.
d. Enable Use developer features to deploy apps from Visual Studio to your HoloLens. If your device is running Windows Holographic version 21H1 or newer, also enable Device discovery.
e. The IP address of the headset will be displayed floating in front of the headset. Take note of this IP address, since it will be used in the Using HoloLens steps below. Then click the Print tab.
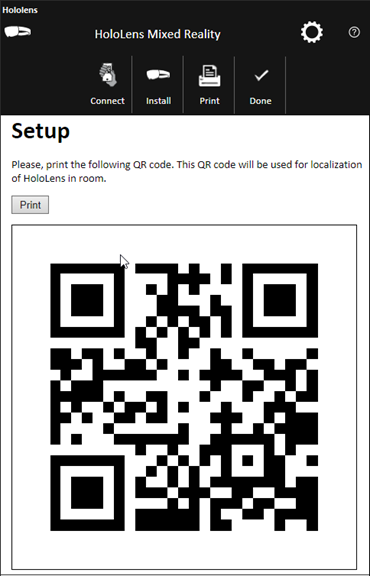
7. Print the QR code and place it in the room: The location of the virtual table on which the hologram will be displayed is determined simply by where you place this printed QR code. Click Print to print a physical copy of the QR code. Then click the Done tab.
8. Note that you can always return to the Setup dialogs by clicking Settings ![]() .
.
To use HoloLens:
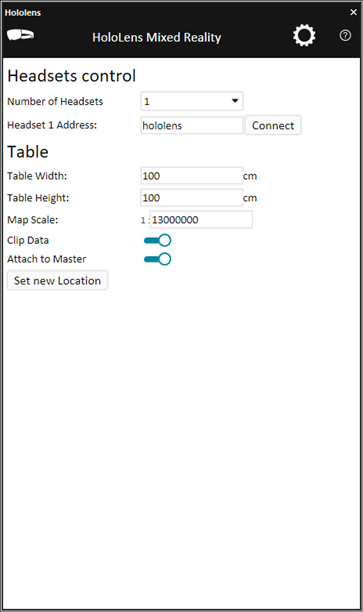
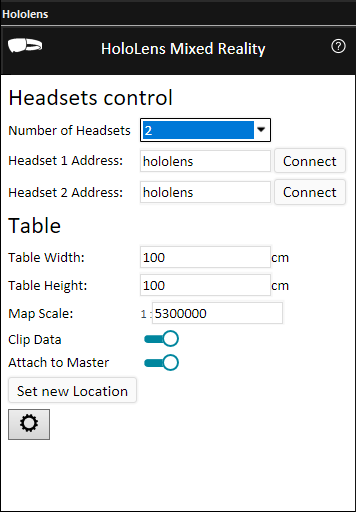
§ Set the headset address and virtual table details: Set the properties in the HoloLens dialog. See property descriptions below.
|
Headsets Control |
|
|
Number of Headsets |
Number of headsets that will be connected to TerraExplorer. Up to 4 headsets are supported. Skyline Remote Player must first be installed on each of the headsets. See step 6 above. |
|
Headset Address |
IP address of the connecting headsets. After installation of Skyline Remote Player is complete (see step 6 above), the IP address of the headset device will be displayed floating in front of the headset. Enter this IP address here. Click Connect to connect between TerraExplorer and the HoloLens headset. |
|
Table |
|
|
Table Width |
The width of the virtual table on which the TerraExplorer hologram will be displayed. A virtual table is created wherever the QR code is placed. |
|
Table Length |
The length of the virtual table on which the TerraExplorer hologram will be displayed. A virtual table is created wherever the QR code is placed. |
|
Map Scale |
Automatically adjusts to the scale of the currently displayed view in the hologram. |
|
Clip Data |
Toggle on to limit the dimensions of the hologram to those set in table width and length. |
|
Attach to Master |
Connects the TerraExplorer GUI (Master) to the virtual hologram view. Any movements made in the Master interface will reflect in the hologram view. |
|
Set New Location |
Updates the area displayed in the virtual hologram to the current location in the TerraExplorer 3D Window. The area displayed in the virtual hologram is marked in the TerraExplorer GUI by a blue frame. |