Create Pipelines
This tool creates 3D pipelines long a user-defined path. The output of a create pipeline operation is either a group or a point feature layer, with pipe and connector objects. Both outputs can be saved to local data sources (Shapefile format) and loaded as Streaming or Entire layers.
Note: The pipelines tool does not support multipart features.
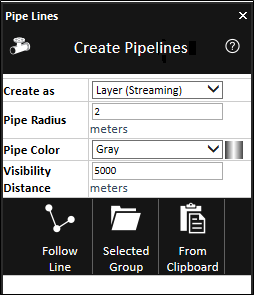
Create Pipelines Dialog
To create pipelines:
1. On the Tools tab, in the Draw Tool group, click Pipelines. The Create Pipelines dialog is displayed.
2. Select the Create as option:
|
Option |
Description |
|
Group |
Create a group with objects. |
|
Layer (Entire) |
Create feature layer under the application AppData. |
|
Layer (Streaming) |
Create streaming feature layer under the application AppData. |
3. Enter the following parameters:
|
Parameter |
Description |
|
Pipe Radius |
Type the desired radius. |
|
Pipe Color |
Select the required color. |
|
Visibility Distance |
Set the visibility distance of the objects. |
4. Select one of the following methods of designating the pipelines to be created:
|
Method |
Description |
|
Follow Line |
Create pipelines along a line. Click Follow Line. Then in the 3D Window, left-click to place the line waypoints, and right-click to complete the line |
|
Selected Group |
Create pipelines along all polylines in a selected group or layer. Select the required group or layer from the Project Tree and then click Selected Group. Note: Only first level polylines in an existing group are included. Note: The pipelines tool does not support multipart polylines. |
|
From Clipboard |
Create pipelines along a clipboard object. Note: Pipelines are only created for polyline clipboard objects. Click From Clipboard. |
5. If you want to edit additional parameters, right-click the pipeline group/layer in the Project Tree and select Properties.