Create Fences and Walls Tool
The Create Fences and Walls tool enables you to easily create fences and walls in the precise dimensions, shape and texture you require. The output can be saved as a TerraExplorer group of objects or as a feature layer (shapefile).
A fence or wall can be created through the simple view (by clicking on the required fence/wall image) or through the advanced view that enables manual setting of relevant parameters.
To use the Create Fences and Walls tool:
1. On the Tools tab, in the Draw Tool group, click Create Fences and Walls. The Create Fences and Walls dialog is displayed.
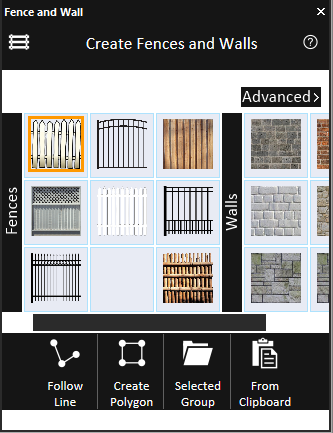
Fence and Wall Tool
2. If you want to create the fence or wall through the Simple view, select the required fence or wall style, by clicking a fence or wall image. This will automatically set the appropriate texture file as well as other parameters and create a Project Tree group that contains all the created fences/walls.
Note: Once parameters are set in the Advanced mode (see below), these parameters are applied to all fences and walls created while the Fence and Wall tool remains open. Once the Fence and Wall tool is closed, the default parameters are restored.
3. If you want to use a different texture and/or manually set other parameters for the fence or wall, click Advanced. A Fence and Wall property sheet displays with fence/wall parameters.
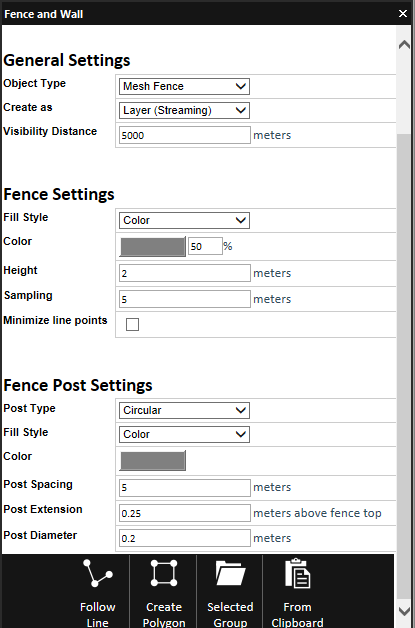
Fence and Wall Parameters
4. In the General Settings section, enter the following parameters:
Note: Once the Object Type is selected, the settings displayed below the General Settings section change to correspond to the selected type.
|
Parameter |
Description |
|
Object Type |
Select one of the following: § Mesh Fence – Fence with either a solid colored or textured surface. § Wall – Object with measurable width. § Wall with Fence Top – Wall with a mesh fence (solid colored or textured) on top of it. § Wire Strand Fence – Fence made of horizontal wires. Note: A wall differs from a fence in that it has measurable width. |
|
Create as |
Select one of the following: § Group – Create a group with fence/wall objects. If the fences or walls are being created based on the polylines or polygons in a selected group or layer (See step 6 below), the new group will contain a fence/wall object for each polyline or polygon in the original group or layer. § Layer (Entire) – Create a feature layer under the application AppData. If the fences or walls are being created based on the polylines or polygons in a selected group or layer (See step 6 below), the new layer will contain a feature for each polyline or polygon in the original group or layer. § Layer (Streaming) – Create a streaming feature layer under the application AppData. |
|
Visibility Distance |
Sets the maximal distance from the camera above which the fence/wall disappears. |
5. Enter the parameters that are relevant for the selected object type:
|
Parameter |
Description |
|
Wire Strand Settings (For Wire Strand Fence) |
|
|
# of Strands |
Number of horizontal wires to be placed within the height of the fence. |
|
Strand Color |
Color of the wires. |
|
Height |
Height of the fence. |
|
Sampling |
Distance between points added to the fence, in meters. The smaller the spacing, the more accurately the fence follows the terrain, but the longer it takes to calculate. |
|
Minimize line points |
Simplifies the number of sampling points calculated for the fence. |
|
Fence Post Settings (For Mesh Fence, Wire Strand Fence, and Wall with Fence Top) |
|
|
Post Type |
Select one of the following types: § None – No fence posts are rendered. § Circular – Fence posts are rendered as cylindrical objects. § Square – Fence posts are rendered as rectangular objects. |
|
Fill Style |
Select the fill type for the posts: § Color – The posts get a single-color filling according to the Color field. § Texture – The posts get the texture from an external texture file according to the Texture field. |
|
Color |
Select the color of the posts and the % opacity of the post fill. |
|
Texture |
Browse to the GIF, JPEG, or PNG to provide the texture for the posts. |
|
Post Spacing |
Type the required distance between posts, in meters. The smaller the spacing, the more accurately the fence follows the terrain, but the longer it takes to calculate. |
|
Post Extension |
Height, in meters, that the posts extend above the fence. |
|
Post Diameter |
Diameter of the rendered circular posts or width of the rendered rectangular posts, in meters. |
|
Wall Settings (For Wall and Wall with Fence Top) |
|
|
Fill Style |
Select the fill type for the wall: § Color – The wall gets a single-color filling according to the Color field. § Texture – The wall gets the texture from an external texture file according to the Texture field. |
|
Color |
Select the color of the wall and the % opacity of the fill. |
|
Texture |
Browse to the GIF, JPEG, or PNG to provide the texture for the wall. |
|
Height |
Height of the wall in meters. |
|
Wall Width |
Width of the wall in meters. |
|
Sampling |
Distance between points added to the wall, in meters. The smaller the spacing, the more accurately the wall follows the terrain, but the longer it takes to calculate. |
|
Minimize line points |
Simplifies the number of sampling points calculated for the wall. |
|
Wall Post Settings (For Wall and Wall with Fence Top) |
|
|
Post Type |
Select one of the following types: § None - No wall posts are rendered. § Circular – Wall posts are rendered as cylindrical objects. § Square – Wall posts are rendered as rectangular objects. |
|
Fill Style |
Select the fill type for the posts: § Color – The posts get a single-color filling according to the Color field. § Texture – The posts get the texture from an external texture file according to the Texture field. |
|
Color |
Select the color of the posts and the % opacity of the post fill. |
|
Texture |
Browse to the GIF, JPEG, or PNG to provide the texture for the posts. |
|
Post Spacing |
Type the required distance between posts, in meters. The smaller the spacing, the more accurately the wall follows the terrain, but the longer it takes to calculate. |
|
Post Extension |
Height, in meters, that the posts extend above the wall. |
|
Post Diameter |
Diameter of the rendered circular posts or width of the rendered rectangular posts, in meters. |
|
Fence Settings (For Wall with Fence Top) |
|
|
Fill Style |
Select the fill type for the fence top: § Color – The fence gets a single-color filling according to the Color field. § Texture – The fence gets the texture from an external texture file according to the Texture field. |
|
Color |
Select the color of the fence top and the % opacity of the fill. |
|
Texture |
Browse to the GIF, JPEG, or PNG to provide the texture for the fence top. |
|
Height |
Height of the fence top, in meters. |
6. Select one of the following methods of designating the fences/walls to be created:
|
Method |
Description |
|
Follow Line |
Build a fence or wall along a line. Click Follow Line. Then in the 3D Window, left-click to place the line waypoints, and right-click to complete the line |
|
Create Polygon |
Build a fence or wall along a polygon’s borders. Click Create Polygon. Then in the 3D Window, left-click to place the polygon waypoints, and right-click to complete the polygon. |
|
Selected Group |
Build fences or walls along all polygons or polylines in a selected group or layer. Select the required group or layer from the Project Tree and then click Selected Group. Note: Only first level polygons and polylines in an existing group are included. |
|
From Clipboard |
Build a fence or wall along a polyline or polygon clipboard object. Click From Clipboard. |
7. If you want to edit these or additional parameters, right-click the group/layer in the Project Tree and select Properties.